10 + Simple Tips For Improving Your Photography Part 2
Thanks for coming back for part two to grab a few more tips for improving your photography. If you missed yesterdays post you can see it here or view it after you read this one. We are picking up with a case study from yesterday of photographs I took for a post I created. I’m sharing why I didn’t use them and how I took the next shot and / or edited the photographs to improve upon them. I shared yesterday that your not going to get great photography shots in one take. Unless you are an amazing photographer, even then they take multiple shots. Especially if they don’t have their camera plugged into a computer.
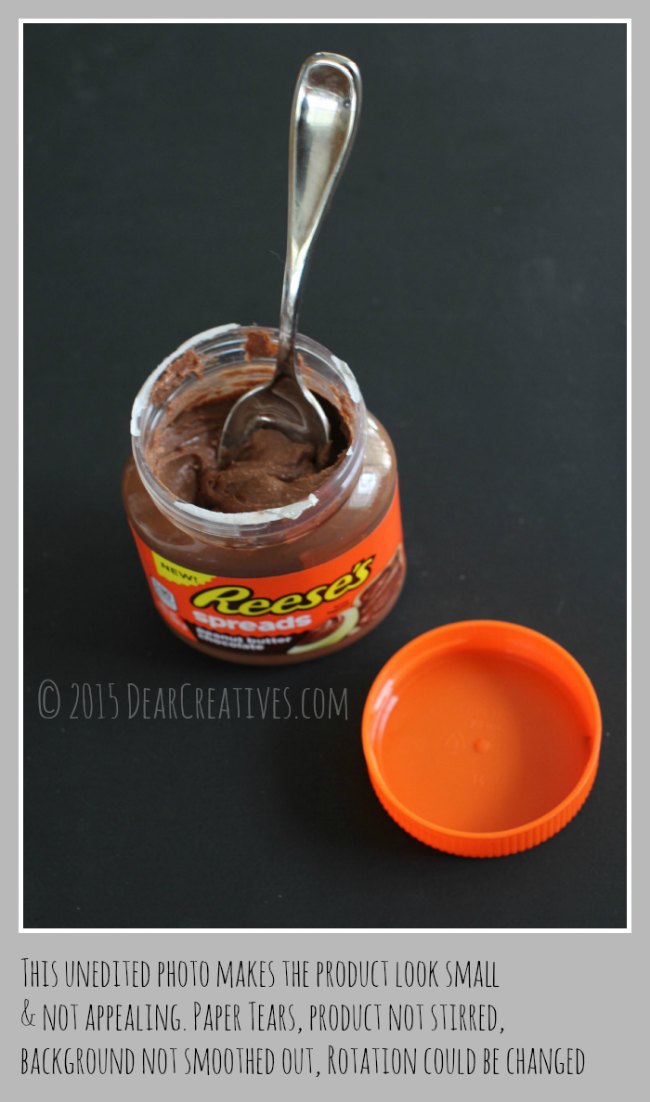
The photograph below is in the raw and unedited other than size for uploading to the site, frame & text. From the angle I took the shot it made the jar seem really small. It’s not a super small jar. It’s shorter than another brand but wider, with a weight of 13 oz. Perspective is something to be aware of. See how the spoon looks really big, it’s just a teaspoon.
I was originally trying to get the shot of the Reese’s label but, looking down into the product to share with you the quality of the product. Although, I’m not 100% satisfied with the image I did end up using a similar shot in the post. It’s better shot closer up which shows a more accurate perspective.
In the photo I used I blurred the paper tear edges and stirred the product. I didn’t have time to sit and rip off all the paper. I mean do you when you use a product? Tear off every little shred? If it comes off yeah! If not, that is actually how it is.
When giving an honest review it’s important to show and share what is real. That’s not a bad thing. It’s just not a pretty image thing. I had plenty of shots to pick from. You can see the post photos here to compare.
- Unless you have your camera hooked up to a computer monitor you won’t know 100% how it will translate onto the screen but, you may have an idea. When I took the photo below in the moment I didn’t see the shadow cast on the lid. Only when I viewed it on the computer. It’s important to try shots out of your comfort zone and learn from them.
Click to enlarge
Simple tips for getting a better photography shot;
- Move the items your shooting around
- Change your angle
- Shoot from a level angle or grab a chair and climb on top to look down
- Use natural lighting
- Watch the light in your home and make time to use it at it’s best light
- Too bright in your home? Filter the lighting with shades, a soft cloth or filter
- Keep your photo props simple if your focusing on sharing a product shot (In comparison if you view my Broccoli Quiche post there is a lot going on, I was setting a mood/ full gathering. Here the focus was on sharing entertaining tips yet, when it comes to the product shots they were front and center.)
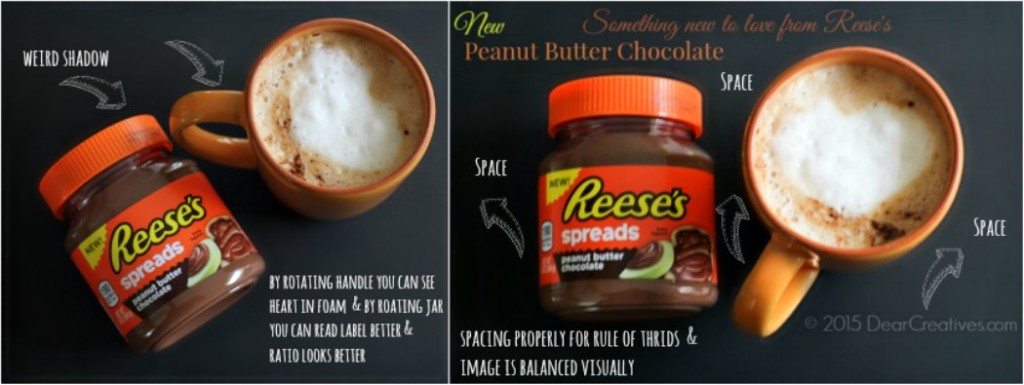
- Use the rule of thirds
- Use a good editing software play with over lays but, be subtle
- Use a good editing software I use PicMonkey in addition to Adobe LightRoom Why two? Options! PicMonkey offers lots of overlays, filters and text if you don’t have Photo Shop or know how to use it you can’t beat it! You can sign up for free if you don’t have PicMonkey. I did the free version first and loved it so much I switched to their Royal version which just has more options the cost is $35. a year = to .09 a day (& no contracts) at the time of this post.
Number one tip for getting a better photography shots;
- Practice!
- Well, and take a class
- And then practice some more!
These tips I’m sharing today are from my experiences of learning. To get an idea of how much practice I do I typically shoot between 10k-15,000 a year. I still have a long ways to go. If your interested in just a few of the classes I’ve taken see yesterday’s post and the class link at the bottom of this post. I don’t share all my best work on the site as I’m hoping to put together a book and ebook hopefully sooner than later.
With continued editing of lighting, color correction, shadows you can take a simple shot and create a beautiful photograph. Well, I hope you like it! Why didn’t I use this photo in the review post? I wanted to keep the color and style of the photography the same throughout the post. That is something to consider when retaking shots or picking shots to use. Another reason to take more photos than you need. You can always delete them, that’s the beauty of digital.
Want more tips and ideas on how to improve on your photography? For yourself or your blog? Be sure to subscribe rss/ sign up for email newsletters
The reason I like to take eclasses is it helps to see exactly what the photographer is doing and hear how they explain things as they are working. It’s almost like you were right there! If your interested in the photography class I’m taking you can check it out here: Food Photography From Plate to Photo with Andrew Scrivani. It comes with a 100% guarantee and you can watch it at your convenience! Which is perfect for stopping and starting at any point! And keeping notes along the way! Happy Shooting.
What things are you challenged by when it comes to your photography?
- Do you have any tips for others be sure to share them in the comments or if you have a photography tips posts link it up on Friday and Saturday’s linkup party.


This is great info! I do pizza segments and recipes involving essential oils. I have yet to be able to invest in a quality camera, but I’ll get there eventually. I love your “rustic banana bread” photo!
Hi Sara, Thanks I’m glad you found it helpful. Yes, you’ll get your better camera. I had several and kept working my way up over several years. Thanks for the compliment. I enjoyed that photo shoot and then we ate the yummy bread. One of the perks of taking pictures of food right! Hope to see you again soon.
Thank you for the tips, I am still trying to learn this photography thing 🙂
Hi Ros, Keep practicing! I’ll be sharing more tips stay tuned!
Awesome. I missed part 1…going back to check it out now!
Hi Jill, Thanks for dropping by and checking out the tutorials.
Thanks for sharing these tips! I really need to get better at taking/editing pictures.
Hi Joanna, I keep trying to improve mine it’s a practice, learn and practice more process. But, well worth the time.
Great tips! I never thought of shooting from above — I need to improve my photography!
Hi Lauren, Thanks for stopping by! Some of my favorite shots are from above but, just be careful you don’t want to fall. Watch out for ceiling fans too! lol Keep shooting! Hope to see you again soon!
Great tips! I’m always too lazy to get out one of my DSLRs for blog photos and use my phone instead. It’s a bad habit, but you have inspired me to work on my photography. Thank you!
~Lisa
Hi Lisa, Glad you liked the tips. My iPhone is old maybe I’d do that once in a while for photos but, I usually do those shots for Instagram vs the blog. Thanks for stopping by! Keep Shooting & good luck!
Thanks this is great timing! It’s so true, you don’t know how it will look on screen every single time. I will use these tips next time. I usually just take a bunch of pictures and hope one comes out right! LOL!
Hi Jennifer, Thanks for dropping by. Glad these tips will help you! Ya, sometimes winging can work but, learning helps you master and improve. Keep shooting!I’m still WIP with things and I take a lot of pics. Hope to see you again soon.