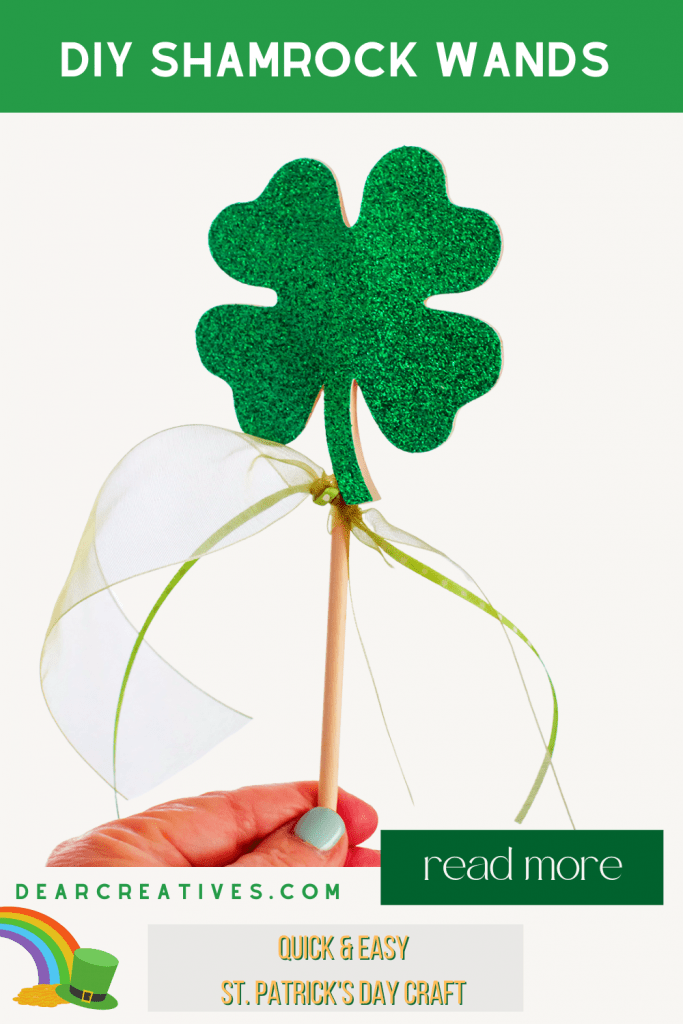
DIY Shamrock Wands – St. Patrick’s Day Craft (Cricut or Hand-Cut!)
Looking for a magical way to celebrate the holiday? Shamrock Wands are easy to make for your celebrations or decorations for St. Patrick's Day! This is an easy Shamrock craft to make with the Cricut or scissors. This Cricut craft project even includes a free Clover template to print and use!
Use the designed four-leaf clover template in Cricut Design Space (instructions below). Cut this project with the Cricut cutting machine, or if you don't have a digital cutting machine yet, you can easily cut the clovers by hand. Below you will find a video of me cutting it out with the Cricut and the craft tutorial on how to assemble the wands. If you love this, see all our St. Patrick's Day Crafts and more Cricut Craft Ideas here. Let's make these DIY Clover Wands
Why You'll Love These DIY Shamrock Wands
Shamrock wands
- St. Patrick's Day Wands are easy to make with glitter cardstock paper (or cardstock paper), dowels, ribbons, and a hot glue gun or craft glue…
- Use the wands to hold at St. Patrick's Day parades or as decorations for St. Patrick's Day.
- Did you know the Shamrock is the national emblem of Ireland? The lucky clover has 4 leaves.
We used our Cricut cutting machine for this Shamrock craft. If you don't have one yet, you can use craft scissors to cut clovers and follow the instructions.
St. Patrick's Day Wands
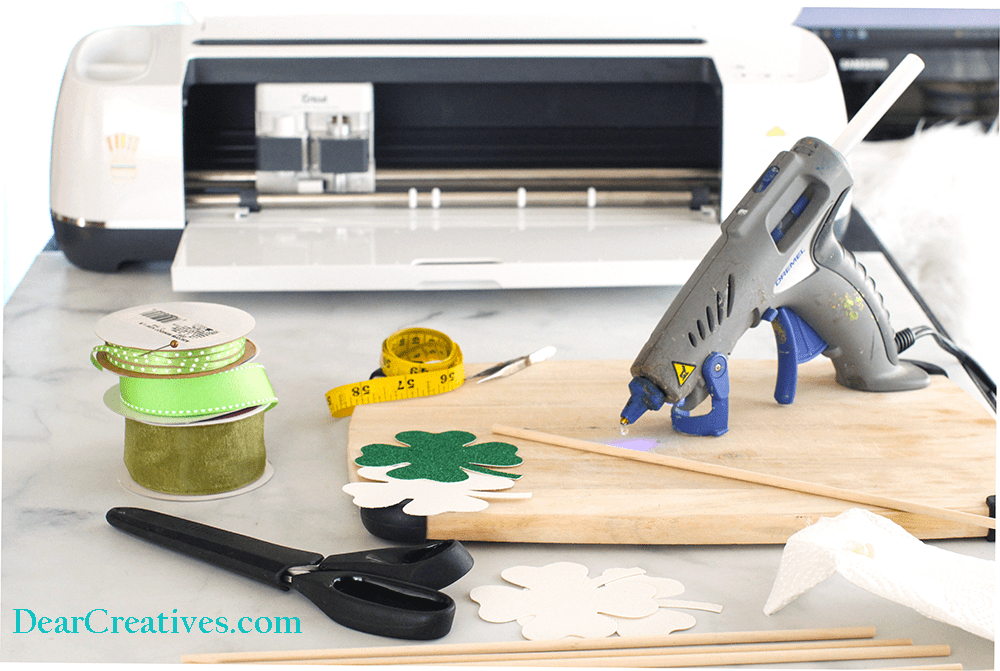
Supplies for Your St. Patrick's Day Wands
- Glitter Cardstock Paper (This is my favorite! It doesn't lose its glitter!) Price check it there!
On sale at Cricut right now (LTO)! Glitter Cardstock (What a savings!) - 3/16th inch Dowels
- Ribbons – (St. Patrick's Day Ribbons) and (1-1/2 inch moss ribbon)
- Hot Glue Gun and Glue Sticks
- Sewing Scissors (for cutting ribbons)
- Measuring Tape or Ruler
- Craft Scissors or Cricut Maker or other Cricut Cutting Machine
- Template For Four Leaf Clover (compatible with Cricut)
- Free Printable 4 leaf clover template (if cutting by hand). Scroll down to the words – Get The Clover Templates (in red)
- 4 Leaf Clover SVG files (compatible with all cutting machines, or to design a cut file or design a template with).
Note- I made my clovers 3 inches, but you can adjust the size in Cricut. You can use regular cardstock if you prefer. Here are a few choices we like for the Cricut craft.
Where to shop for SVG files and graphics for crafts

Don't have time to make wands for St. Patrick's Day? Not crafty? Here are my favorite St. Patrick's Day Wands on Etsy. Order them early to get them on time!
Tips for Assembling The Paper Wands
Cut equal amounts of clovers. Cut one set of clovers as shown on the template. And another set of clovers with the mirror image on! This will ensure your glitter cardstock is on the proper side for making the craft and gluing the clovers together!
You can hover over a clover on the cut page and bring up the hide image if you want to cut fewer clovers than shown.
For example, if you are making 9 wands total. Cut 9 clovers with the template. Cut another 9 clovers with the mirror image on. You will find the toggle on the cut page. (shown below in image)
If cutting them by hand, cut with the template for the amount you want. Then, flip the glitter cardstock paper over to cut the design opposite. Do a test cut to make sure this aligns with both proper sides facing out. Before cutting them all.
Are you ready to make a craft for St. Patrick's Day?
How To Make Glitter Clover Wands (Cricut or Hand-Cut Tutorial)
Using the Clover Template in Design Space
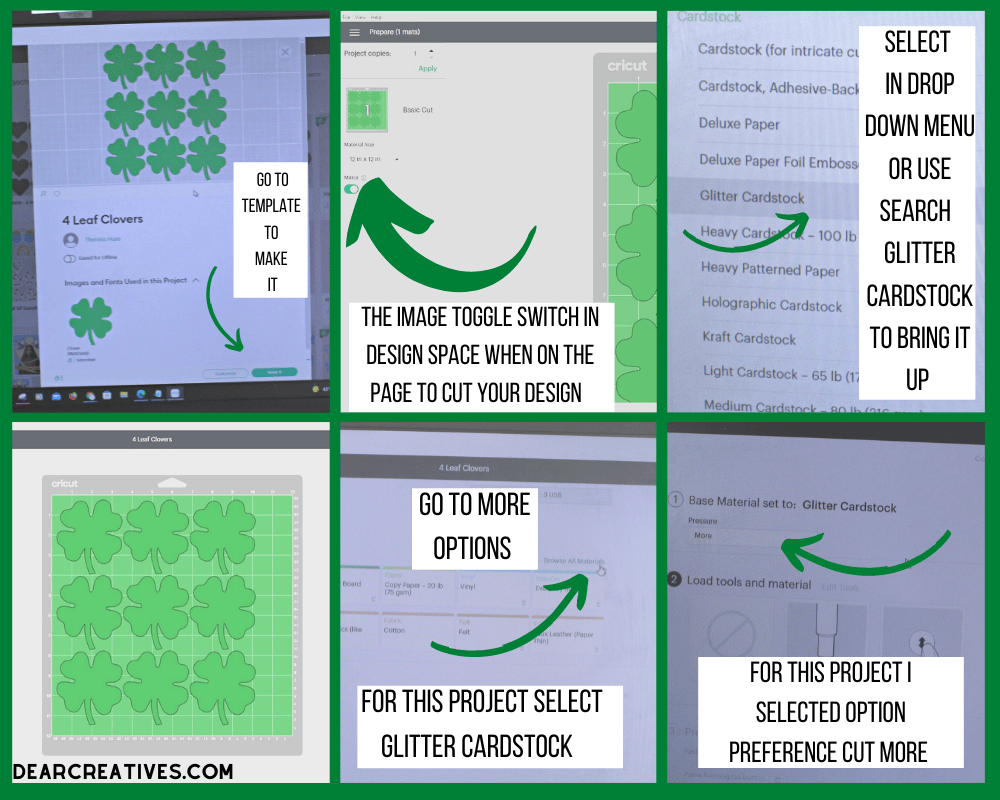
Instructions
- Bring up the template in Design Space (sign up if free!) If you don't have Cricut Access (scroll down the page after going to the link to find out more and compare free to paid app plans, and or purchase the app.), you can pick a clover design by searching images and by creating your template. Video – Guide To Using Cricut Design Space for Beginners
- Select “make the design”.
Hand-Cutting Instructions
If you are cutting by hand, select print and cut. Print 1 sheet of the template regular and 1 sheet of the template mirrored. Move on to the steps to make the Shamrock wand project. Note: Place the pattern over the top of your cardstock and tape the top and bottom. Then cut the clovers out. - Make sure your Cricut machine is on and connected to use.
Make sure you are signed into Cricut Design Space - It will bring you to the mat-cutting page.
- Select more materials and pick glitter stock.
- For the pressure, I selected the preference more (this cardstock is thick)
- Go to cut the design.
- Repeat the process for the back side clovers. Only this time select the toggle switch mirror image!!! Do This BEFORE CUTTING THE DESIGN!
- After selecting the Mirror Image, follow the same steps to cut the design.
- Now that the clovers are cut. Assemble the project from the instructions below!
How to Assemble the Wands
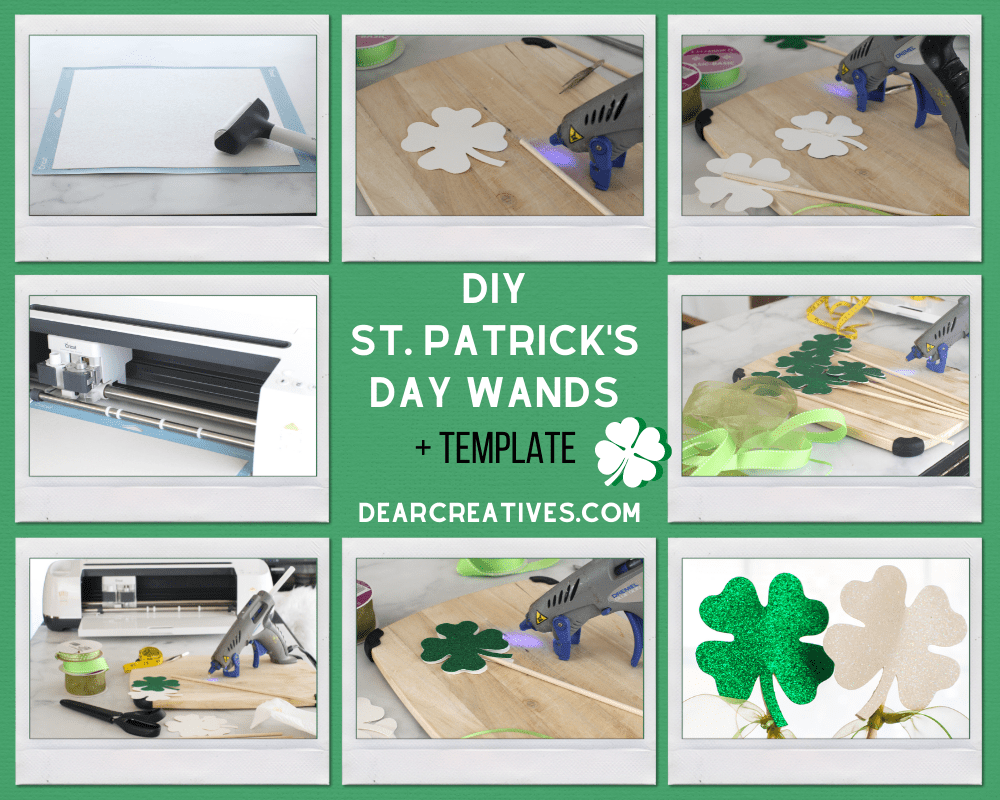
- Heat up the glue gun.
- Cut the clover shape. (I made mine 3 inches). Do this by hand or with the Cricut using the clover template. You can adjust the size if needed.
- Face the clover glitter side down on the craft table or protected workspace.
- Make a bead of hot glue on the cardstock in a line in the middle.
- Place the dowel directly onto the hot bead of glue. Turn it over and make sure to align the clover's stem centered on the dowel.
- Repeat this process for the opposite side of the dowel. Now, align the two clovers evenly.
- Let it dry.
- Cut the ribbons 14 inches. Coordinate the ribbons to go with the craft project's cardstock and/or theme.
- Next, hot glue the inside of the clovers on all four sides of the clover. Hold down the sides after gluing. Do this until the section is dry.
- When all the sides are done, add the ribbon tied just under the tip or near the bottom of the clover stem.
- Slide the ribbon down slightly and hot glue it into place by sliding the ribbon over the hot-glued dot.
- Repeat the same process for as many clover wands as you want to make!
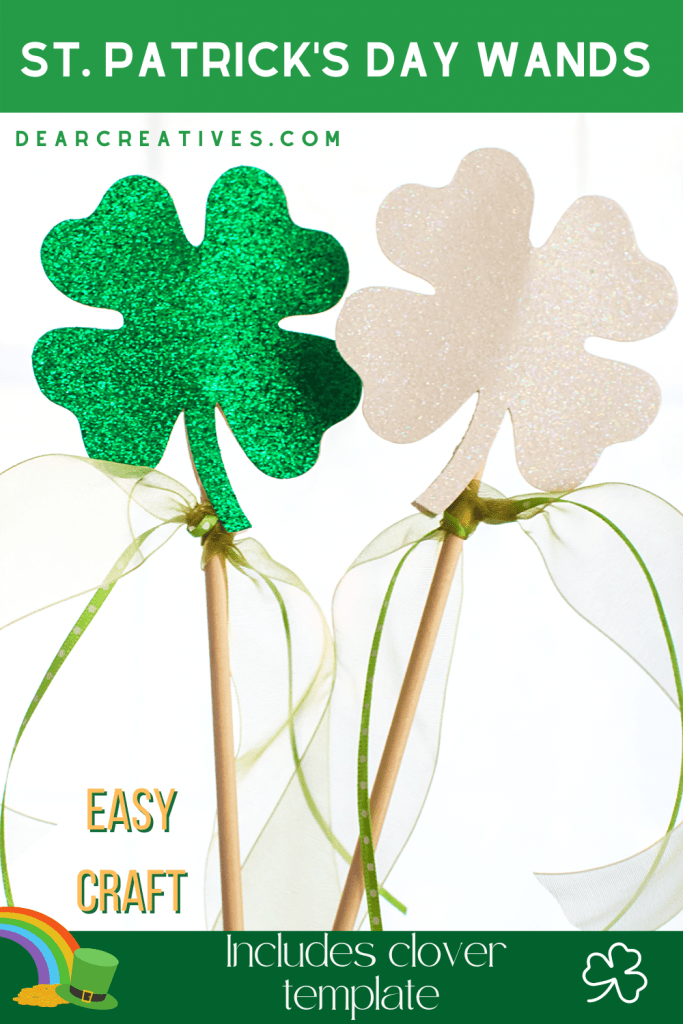
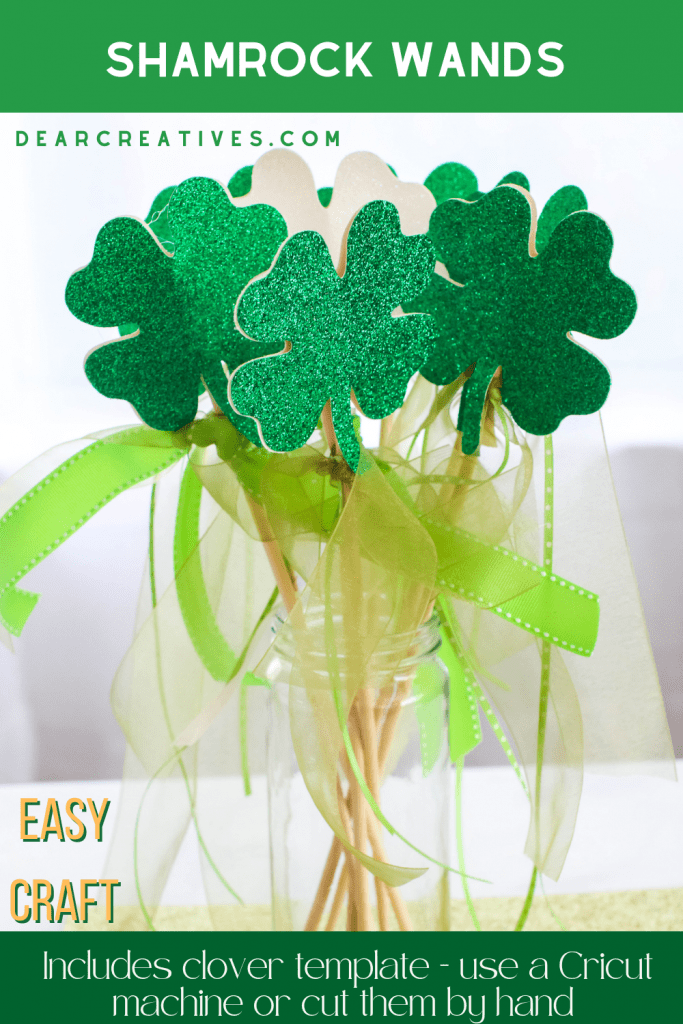
The Clover Fairy Wands Are Done!
Tada! Now you have glitter clover wands (clover fairy wands) to use in your St. Patrick's Day Celebrations and for your decorations! You might like to make a frosted clover luminary put them into! Or use a vase, mason jar, or jar. Keep the Shamrock Wands in jars and take them out to use.
Video Tutorial: How to Cut and Assemble Shamrock Wands
Be sure to share the Shamrock wands (clover) fairy wands, St. Patrick's Day Wands you make, and how you used them by tagging me @DearCreatives on Instagram or Twitter with your craft projects! Or share your projects on our Facebook Page.
5 Fun Ways to Use Your Shamrock Wands
- Photo Booth Props: These wands are the perfect size for kids to hold in St. Patrick's Day photos or school parties.
- Table Centerpieces: Stick a few wands into a vase filled with gold chocolate coins or green candies for a festive table display.
- Party Favors: Give these out at the end of a classroom party as a “lucky” gift for students to take home.
- “You've Been Pinched” Gifts: Leave a wand and a treat on a neighbor's doorstep as a fun holiday surprise.
- Wand Play & Storytime: Use them as props during holiday-themed storytime at home or in the library to keep kids engaged.
Not making the project now? Pin the DIY Shamrock Wands Craft to make it later.
Crafts To Make
- Cricut Crafts
- St. Patrick's Day Kids Crafts
- DIY Heart Wands
- Shamrock Wands St. Patrick's Day Craft
- DIY Bunny Wands
- New here? Be sure to Subscribe.
- Pin it for Later
- Follow us on Pinterest
- Shop our favorites on Amazon