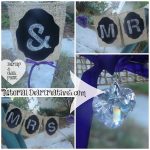
Mr. and Mrs. Wedding Banner DIY (Burlap & Chalk Paint)

Dear Creatives, You know that Mr. and Mrs. wedding banner I shared with you the other day? Well, I created a tutorial to share with you in case you want to make a banner that says Mr. and Mrs. This banner was made with burlap and chalk paint… Anyone who is crafty can make this. Help make one for the bride, sister, or friend's wedding. This banner is made with burlap and painted paper with chalk paint, with chalk lettering added to it.
As requested it has Mrs. & Mr. instead of Mr. & Mrs. for the banner due to how the couple will be seated at the table. But, we all know who rules the house, lol…Nah, it's a partnership!
Looking for something else? See the latest wedding ideas.
Burlap Wedding Banner
This is an older post but, it can be useful to see how to make a banner in this style. I hope this inspires you to make your own version of this wedding banner!

Supply List:
- Woven burlap or Coffee Bag Burlap
- Scissors
- Twine
- Quality Card Stock (not thin)
- Glue for fabric & paper (Yes *paper / fabric glue)
- Clear Gesso
- 1″ or 2″ paintbrush
- Measuring tape
- Ruler
- Black Chalk Paint (or color of your choice)
- Acrylic Fixative (so chalk won't wipe off)
- chalk
- stencil or (hand write)
- Embellishments such as flowers or crystal hearts …*optional
- Wheat or burlap-colored thread
Now that you have gathered your supplies this is how to do it yourself with this step-by-step tutorial.
Mr. and Mrs. Wedding Banner
DIY
Instructions:

Step-by-Step Instructions:
How to make a burlap wedding banner
1. Cut burlap rectangles ( size 5″ wide x 7″ tall /height ) You'll need 6 for this project or adjust it (or the number) to what you need if you change what is on it.
2. Find a shape you like & cut out 6 on quality card stock (not super thin scrapbook paper) & then apply clear gesso (no water on the brush-you can dampen the brush prior, but make sure to squeeze out all the water ) to each one on one side only. Don't worry if it curls a little it will flatten as it dries.
3. When gesso is dry add 2 layers of chalk paint (let dry completely in between paint layers! ) If you can't see through then move on to the next step if you can see through to paper chalk paint a 3rd time
4. A) Give it plenty of time to dry 2-3 layers completely need hours (grab a cup of coffee, catch up on some laundry, pet the kitty, play with the kids…) Then come back with or without a stencil & chalk your words onto the dry chalk-painted paper! Be careful, but also know you can take a damp cloth & wipe off chalk dust, slip-ups, and clean up detailing! Notice the chalk marks here (pic 5) & there wipe what you can off and let dry. (don't worry too much, you will final coat black chalk paint later)
4. B) Take your chalk-lettered pieces outdoors, on a covered area spray lightly with an acrylic fixative so chalk won't dissipate or rub off I used Fixativ 2070 purchased via Dick Blick but, you should be able to find something similar from a hobby shop or Michaels. (don't freak out it looks like it disappears until it starts to dry) let dry completely!!
4. C) While it's drying sew the banner together I used twine I measured *(amount will vary on where you hang it allow for extra twine on each side which you can always cut shorter later) & lined it up prior to sewing. Keep word letters closer together, and allow for spaces between words and the & sign. If sewing loosely woven burlap make sure to go around the edges of rectangles with stitching first so you can pull off the frayed strands & it won't unravel. ( that unraveling by the R, I just pulled it right off )
4. D) Once all letters are dry use a good glue for fabric and paper to adhere to the burlap. I used Yes ( it is a great glue used for many things including bookbinding) Make sure what you pick dries clear! Allow drying completely
5. Chalk paint over areas that need touching up let dry (don't get too close to your lettering) & spray matte or glossy finish to protect it
6. Let dry completely in a sunny area if possible, then hot glue or hand sew on flowers or embellishments and you are done!
Don't expect to complete this banner super quickly, but the results are amazing in person! It has this country-chic, rustic romantic look that you are going to love, love, love!
If you make one or something with the tutorial I'd love to see it and even feature your project so be sure to email me! I can't wait to share photographs from the big day and where it will be hung!

Do you enjoy making banners?
Have you planned a DIY wedding or helped with one?
Want to save it? Pin it to Pinterest.
Don't forget to check out the freebie offers below I am happy to pass on to you! & also check out the projects & tutorials pages
-
Are you new here? Don't forget to Subscribe and get all our latest posts to your inbox!
-
RSS FEED subscribe (for feed readers)
-
Like and follow us on FaceBook ..
Pring the tutorial:
Wedding Banner Tutorial- Mr. & Mrs. (Burlap & Chalk Paint)
Ingredients
- Supply List:
- Woven burlap or Coffee Bag Burlap
- Scissors
- Twine
- Quality Card Stock not thin
- Glue for fabric & paper Yes
- Clear Gesso
- 1 " or 2" paint brush
- Measuring tape
- Ruler
- Black Chalk Paint or color of your choice
- Acrylic Fixative so chalk won't wipe off
- chalk
- stencil or hand write
- Embellishments such as flowers or crystal hearts ...*optional
- Wheat or burlap colored thread
Instructions
-
1 Cut burlap rectangles ( size 5" wide x 7" heigh ) You'll need 6 for this project or adjust # to what you need if you change what is on it.
-
2 Find a shape you like & cut out 6 on quality card stock (not the super thin kind) & then apply clear gesso (no water on brush)to each one one side only. Don't worry if it curls a little it will flatten as it dries.
-
3 When gesso is dry add 2 layers of chalk paint (let dry completely in between paint layers! ) If you can't see through then move onto the next step if you can see through to paper chalk paint a 3rd time
-
4. A) Give it plenty of time to dry 2-3 layers completely need hours (grab a cup of coffee, catch up on some laundry, pet the kitty, play with the kids...) Then come back with or without a stencil & chalk your words onto the dry chalk painted paper! Be careful, but also know you can take a damp cloth & wipe off chalk dust, slip ups, cleaning up detailing! Notice the chalk marks here (pic 5) & there wipe what you can off let dry. (don't worry too much, you will final coat black chalk paint later)
-
4 B) Take your chalk lettered pieces outdoors, on a covered area spray lightly with an acrylic fixative so chalk won't dissipate or rub off I used Fixativ 2070 purchased via Dick Blick but, you should be able to find something similar from a hobby shop or Michaels. (don't freak out it looks like it disappears until it starts to dry) let dry completely!!
-
4C) While it's drying sew banner together I used a twine I measured * (see summary notes) & lined it up prior to sewing. Keep word letters closer together, allow for spaces between words and the & sign. If sewing loosely woven burlap make sure go go around edges of rectangles with stitching first so you can pull off the frayed strands & it won't unravel. ( that unraveling by the R, I just pulled it right off )
-
4D) Once all letters are dry use a good glue for fabric & paper to adhere to burlap. I used Yes ( it is a great glue used for many things including bookbinding) Make sure what you pick dries clear! Allow to dry completely
-
5) chalk paint over areas that need touching up let dry (don't get too close to your lettering) & spray matte or glossy finish to protect it
-
6) let dry completely in a sunny area if possible, then hot glue or hand sew on flowers or embellishments & your done!
-
Don't expect to complete this banner super quickly, but the results are amazing in person! It has this country chic, rustic romantic look that you are going to love, love, love!
-
If you make one or something with the tutorial I'd love to see it & even feature it! I can't wait to share photographs from the big day & where it will be hung!
Recipe Notes
All Credits & Copyrights belong to DearCreatives.com & Theresa Huse 2012
If shared on your blog or site please credit ownership. Thank-you

Very Cute Love it!
Hi Anna, Thanks for your visit & happy to see you like it!I can’t wait to get to some seasonal crafting.
This is adorable and can be used in so many different ways too! Thank you so much for sharing this idea. 🙂
Thanks so much for your visit & lovely comment! Your Welcome, glad to share.
Great idea – especially how reusable it is! Thanks for linking to Craftastic Monday at Sew Can Do:)
Hi Cheryl, Thanks for dropping by! I always enjoy visiting your blog & linking up when I get the chance.