This post contains links to affiliate websites, such as Amazon, and other affiliates. We receive an affiliate commission for any qualifying purchases made by you using these links. This is at no additional cost to you. We appreciate your support!
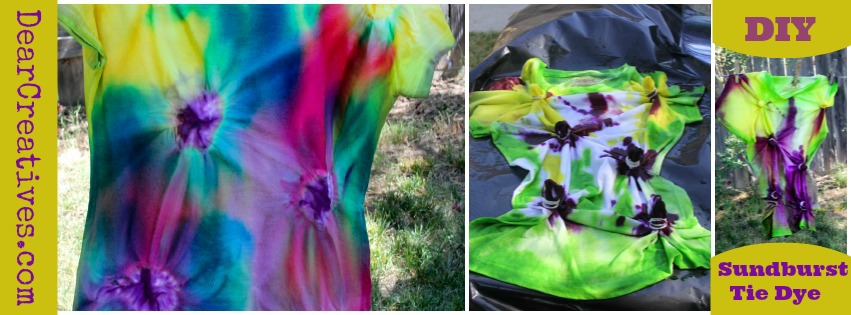
Tie Dye Techniques DIY Sunburst: Are you ready to learn a new tie-dye technique? Making a sunburst designfor your tie-dye t-shirts is easier than you think! Summer and spring are the perfect times to tie-dye outdoors.
We love dying t-shirts with different techniques. One of the techniques we tried was the Sunburst tie-dye technique. Sometimes people call it a starburst technique. I thought I would share how you can dye your t-shirts and how to make a starburst pattern.
Are you looking for other craft ideas for summer? Here’s where to see all our Summer Craft Ideas.
Here are our latest tie-dying techniques and examples of our tie-dye t-shirts.
How to Make a Sunburst Tie-Dye T-shirt
Tie Dye Techniques DIY Sunburst
This technique is pretty easy. You can vary the colors of the sunbursts by using various colored dyes on the pulled-up area. Be sure to use different colored dye or leave white areas to create your effects. You might remember the craft challenge where Sammie and I shared how we did the Ombre dye technique and freehand free pour design techniques. These are also great for beginner tie-dye patterns.
t-shirts, socks, sneakers (For best tie-dye results, use 100% cotton fabrics and 100% cotton canvas fabrics)
Optional plastic bags for covering your work surface
Extra rubber bandsfor your designs and are optional.
Remember to read the kit you purchase and make sure it comes with the dye bottles, tie-dye powder, gloves, and rubber bands. Most I have purchased do but better safe than sorry.
Tie-Dye Instructions
Tie Dye Techniques DIY Starburst Steps:
Have all your materials and supplies ready
Pre-read your dye directions
Pre-Wash sizing out of the t-shirt (*do not add fabric softener)
Take a damp t-shirt to the work area (cover the table with a large plastic garbage bag or other table protectors)
Pre-plan your design
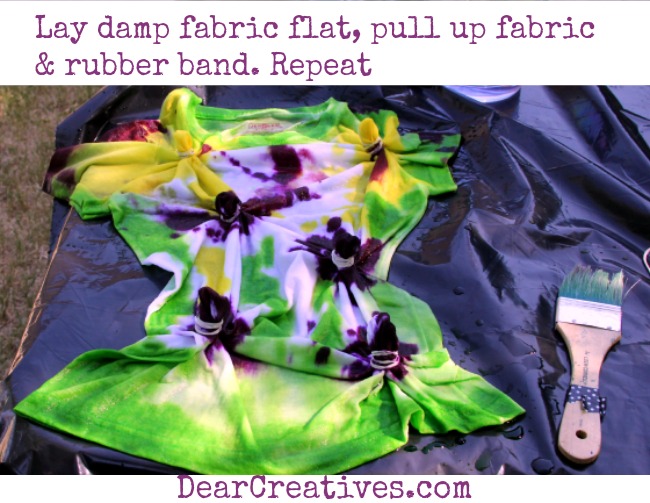
Lay the T-shirt flat
Pull up sections at a time and wrap the rubber band around the fabric
Repeat the last two steps as many times as you want the sunbursts (or starbursts) around the t-shirt
Dye sunbursts or starbursts one color
Color other t-shirt areas another color, and leave areas without color for contrast
Follow dye directions for setting dye (wrap in plastic or put into a clean plastic bag for about 6-8 hours)
Once the dyeing time has passed, you then rinse with warm water until the t-shirt dye runs as clear as possible, wringing as you rinse helps get out the dye
Wash per the dye box instructions and then dry
Wear your lovely dyed t-shirt!
Tie Dying Tips
We hung the shirts on the line with clothespins, just to take photos. You can’t leave them hanging with wood ones. The wood will absorb the dye and leave a faded area on your shirts.
I recommend having a place to lay the shirts down flat until somewhat absorbed, then insert them into your plastic bag or wrap them in plastic.
When setting up your layout, lay plastic to work outdoors, be mindful of animals or small children. You don’t want them touching the dye with their hands or getting the bottles.
See our list below for how to use tie-dye kits.
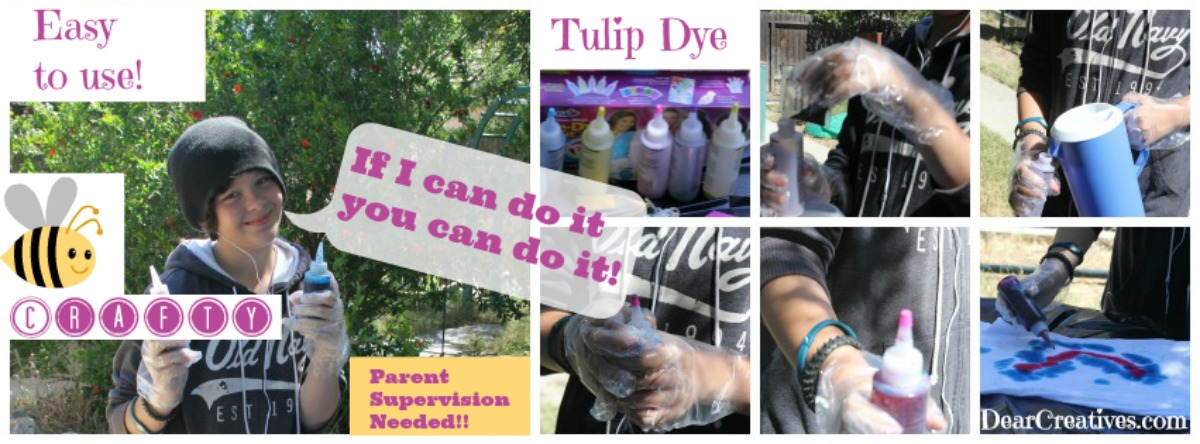
In the previous tutorial, I shared this image but didn’t describe how easy it is to use the dye kits. This is the step-by-step process of how to tie-dye using the kits. Some kits have the dye that comes in packets. Make sure you are in a non-windy area or indoors when filling the dye bottles with the dye powder. You don’t want your dye powder to blow away. Many kits come with the dye in the bottles now, and are really easy to use!
How to Use Tie Dye Kits
Read all the directions from your dye kit first (Follow your dye kit instructions, this is just to show you how easy it is! Most kits will be similar)
Set up your workspace, and cover your table area with a protective cover
Put on your gloves
For some bottles, you snip the top corner (very slightly) with a pair of scissors, pour dye into the bottle. With other kits, you just add water to the dry tie-dye, lid on, shake, and the hole is in the tip already.
Add water to the line on the bottle where they recommend
Secure the lid onto the bottle
Hold the bottle securely and shake until mixed powder dissolves
Dye your t-shirts, socks, sneakers using methods in your dye kits (use 100% cotton-based fabrics)
Note: Supervision is required when using these products ( I do not recommend using them with small children unless you have adult help). Supervision is recommended for 14 years and younger, but I would use personal judgment on the higher end, still using supervision.)
This is a fun summer project! Ok, so now you want to know what kit I used, where to get inexpensive t-shirts, and kid-friendly dye kits, interested in seeing the other dye technique tutorials?
Looking for more tie-dye instructions?
How-to Ombre tie-dye technique and Freehand tie-dying, plus supplies: Tie Dye T-Shirt Post
Star Wars Tee Shirts DIYwith templates. This is a project that teens could try, or you can make for the kids. Create your own Star Wars t-shirts. My grandkids went crazy for these shirts. Your kids will too.
Be sure to tag us @DearCreatives on Instagram or Threads with your Tie Dye Techniques DIY Starburst T-Shirts!


Great post and tutorial Thanks for visiting Cherished Handmade Treasures’ Whatever Wednesday Linky Party. Already a blog follower.
Sandy
Cherished Handmade Treasures
Hi Sandy,Thanks for dropping by & glad you like it.