This post contains links to affiliate websites, such as Amazon, and other affiliates. We receive an affiliate commission for any qualifying purchases made by you using these links. This is at no additional cost to you. We appreciate your support!
Use this chalk paint furniture tutorial and give your home a fresh look! If you're searching for easy home decor DIYs, decorating a piece of furniture is a fantastic way to express your creativity. In this guide, I’ll show you how we used Chalk Paint, stencils, and decoupage papers to completely refresh an new or old cupboard. These techniques are totally customizable to fit your personal style and existing decor!
If you've been searching for a comprehensive chalk paint furniture tutorial to help you master the basics, you’re in the right place. We’ll walk through how to combine Chalk Paint, stencils, and decoupage for a professional finish.
First, we built our coffee and tea cupboard. But, you can do this DIY to any cupboard you already own or even a bookshelf or other piece of furniture. I will list other examples of what you can chalk paint later in the post. Because I know when you see a few examples you will want to try doing this for yourself! I hope you enjoy today's easy DIY improvement project.
How To Use Chalk Paint And Stencils On Furniture
We've been slowing down a bit with the work on our kitchen remodel project. The hours in the day are never enough, and it's pretty costly. I'm lucky enough that when I come up with an idea or concept that I can pass off the construction part to the hubby. But, I wish I had more woodshop skills myself. Do you ever feel like you had more DIY skills?
What's been happening in our home? The hubby works for an excavation company. Pay check's roll in, no one's laid off. But, all of a sudden he's working every Saturday! Which then slows our easy home projects placing them on the back burner. Somehow I managed to get him to build this cabinet for me despite it all. Yeah!
Chalk Paint Furniture Tutorial
chalk paint furniture tutorial
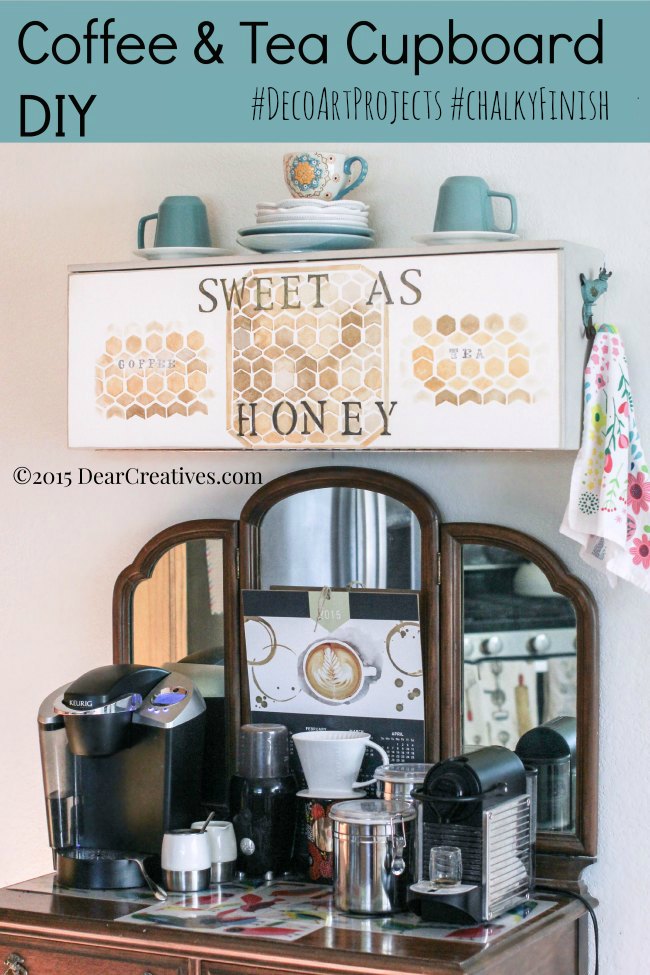
We have a moderate-sized kitchen with a dysfunctional layout and lack of pantry space. I'm not complaining unless I have to reorganize the pantry again. I repeat and again! And yet again! That's when I came up with an idea for the cupboard for all our tea and coffee stash. Because if you didn't know it and are new here WE LOVE COFFEE. You can see all our coffee lovers posts here.
Let's get started on this paint project.
This is a sponsored post for DecoArt All these are all my 100% honest opinions, text, and images.
Why You Need This Chalk Paint Furniture Tutorial
Before we dive into the steps, it’s important to understand why this specific chalk paint furniture tutorial approach works. Using the right prep and finishing techniques ensures your DIY project lasts for years.
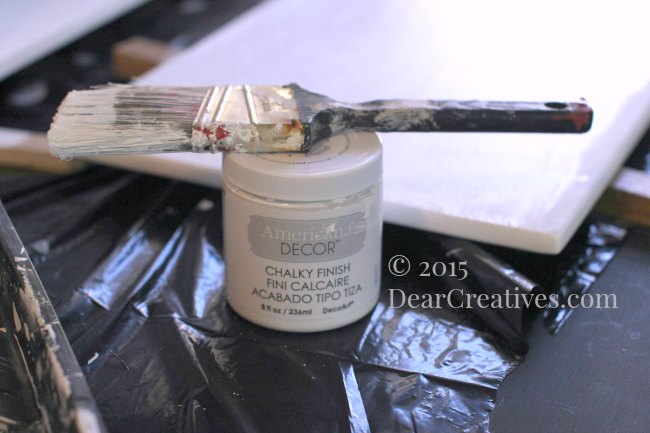
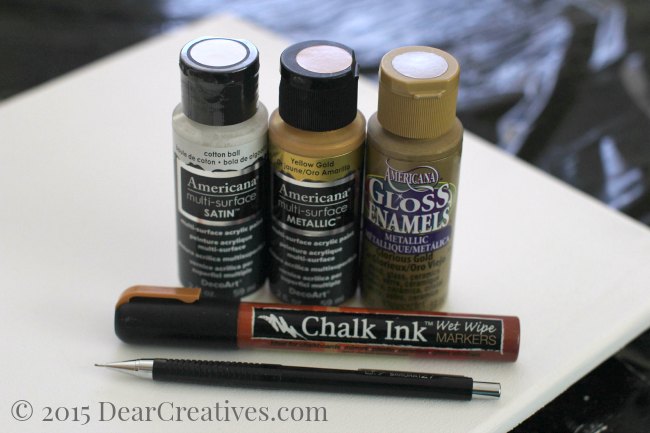
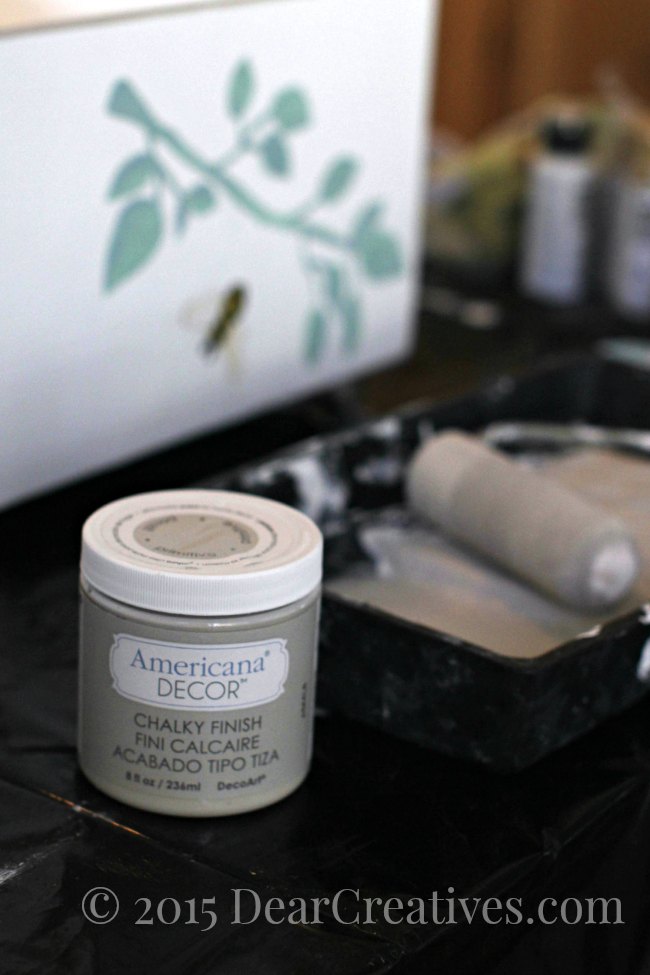
Chalky Finish DIY project Steps: First Gather Your Supplies
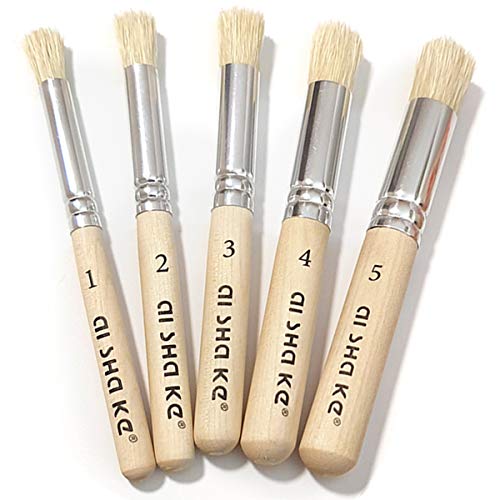
Here is a list of the supplies that I used for this DIY Chalky Finish home project
Make sure your project is clean and wood dust-free
Cover your work surface area with a plastic cover, or other materials (I just open a large heavy-duty garbage bag)
Have all your supplies nearby
Paint your first layer and let it dry
Paint any areas that need a second coat
PRO TIPS: Rarely have I ever had to sand a piece of furniture before using chalk paint, and if I do it's lightly. I have filled nicked furniture with wood putty. Let it dry completely, sand slightly, ensure it's dust-free, and then paint.
Spot paint any areas that need a second coat and let dry (I used the brush for tight corners..)
Step 2
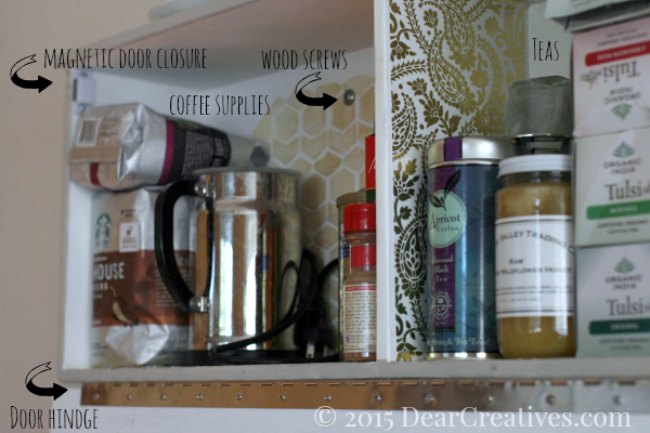
Mark your cabinet door design before the door is attached! Note:The holes for the cabinet hinge were already marked and drilled!!
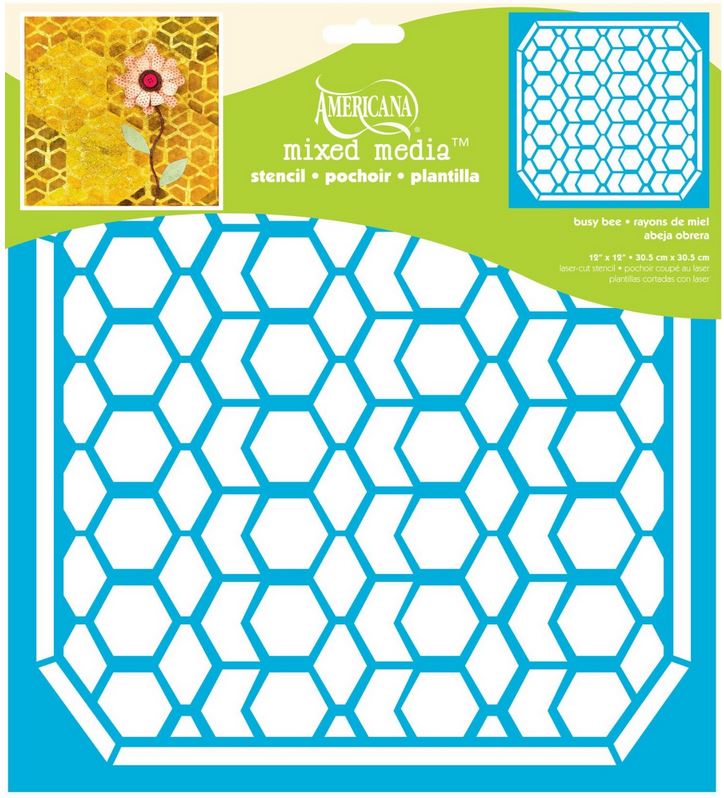
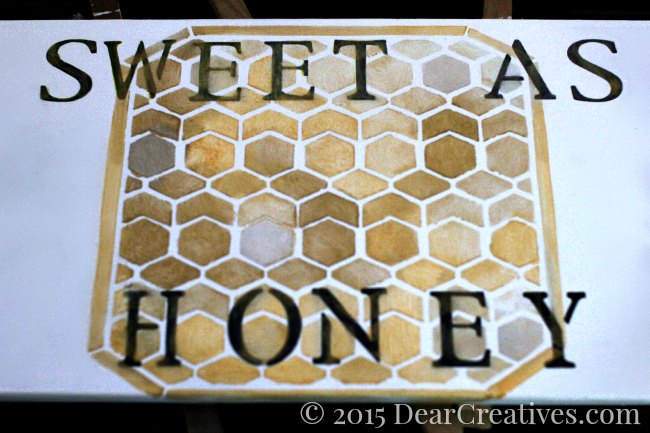
How To Stencil Furniture
(After it's your furniture is painted and dry)Find your center and where you want to layout any lettering! Each project will vary by the words you choose, stencils you have and size of your lettering
I laid my letters side by side and moved them around, then taped them down where I wanted to stencil them
I wanted the word honey to be centered but, inadvertently moved the stencil lettering slightly (oh, well)
Don't do this after you've started using the chalk paint pen as I did, mine is slightly off with the spacing on the bottom
Tip:Find your placement prior to beginning and stick to your design!Do as I say and not as I did. (I'm OK with it)
Step 3
Chalk Ink Paint your lettering in your letter stencil!. Let it dry!
Take the yellow gold and stencil brush in a circular motion or back and forth until the area is covered.
Note:Don't overload your brush, blot on a paper towel. Have a wet paper towel handy and Q-Tips for quick touch-ups prior to drying.
I varied it with the glorious gold and cotton ball to give it a real honeycomb feel.
Tip: You do not wet your brush!If you do for changing colors get as much moisture/wetness out of your brush prior to stenciling.
I even lightly went over parts of the lettering with gold when it had dried. Giving it a softer look. If you use a different chalk pen set or pens be careful! You might want to test it so you don't smear.
Sorry, I don't have more process steps I got carried away! And it's hard to stop taking pictures with paint on your hands. Wink, wink. Here is a close up of one part when I was working.
Need a video tutorial to help you learn how to stencil?
Nervous about your first stencil? This video tutorialshows you exactly how much paint to keep on your brush.
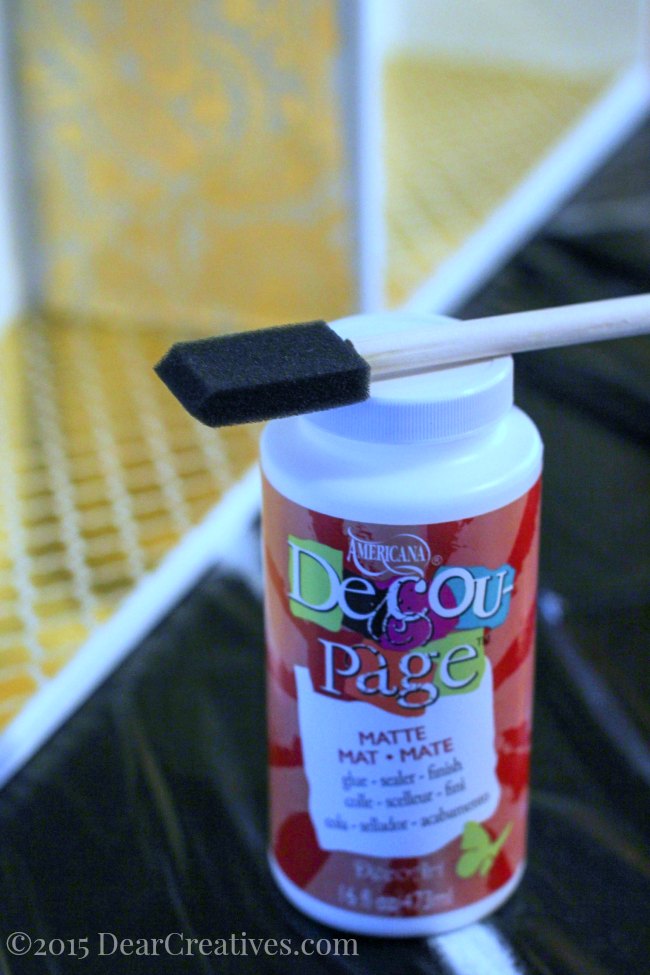
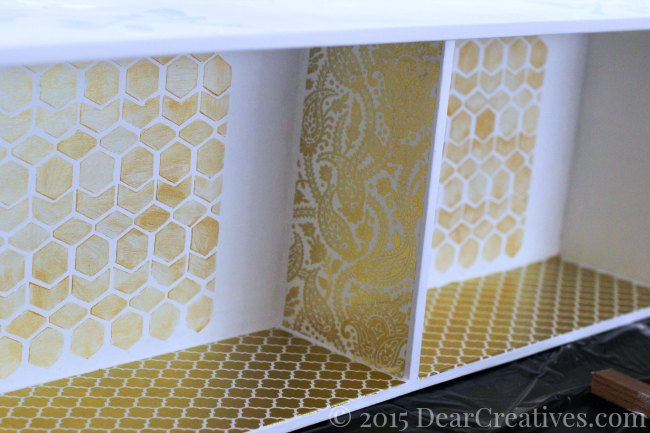
Adding decoupage papers to the project
Step 5
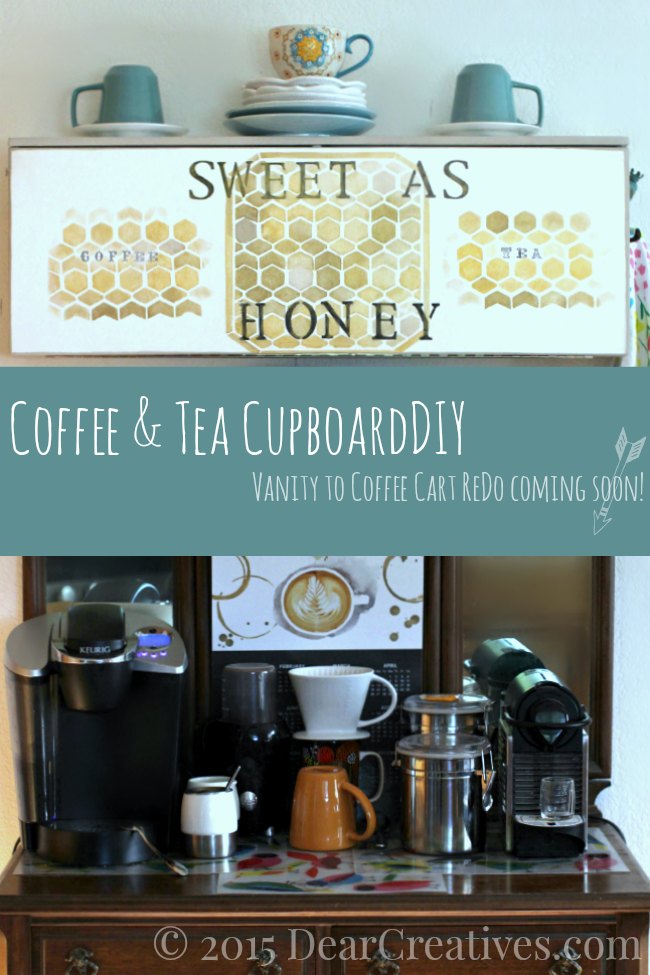
I had the chance to try these new decoupage products! I couldn't resist adding the papers to my design! *see the second image
If you are nervous about ruining your DecoArt papers, this video shows how to get a perfectly smooth finish every time. Link:Master Decoupage in Minutes
Oh, You can see the little bee design, although it's not clear. It's a bee with a branch with leaves I painted on the top. I might add more bees later to the front or inside the cabinet too.
Finishing the project, touching up edges and adding a towel hook to the side
Step 6:
I rolled the primitive chalky finish paint on the sides and defined the edges of the cupboard then let it dry ( I wasn't worried about taping it off or anything just use the very edge and same amount of pressure with a steady hand! I decided I wanted it to match my dresser to kitchen island DIY. Then I let it dry!
Next, you just have the handy person or yourself add the door hinge, attach a cute towel holder hook (similar) and add magnetic door closures. Then you find the studs. No single ladies, not what your thinking! The studs in the wall! Again, the handy person will mount it with two wood screws right to those studs one on each side of the cabinet. I'll be covering those in gold paint.
As quick as this was done I loaded her up! I managed to lighten up my pantry and have the perfect spot for all my coffee supplies and teas! I've been using it daily and love the extra storage it gives me for the kitchen. It's roughly 3′ wide by 2′ tall with a depth of 10″.
chalk paint furniture tutorial
We still might add crystal knobs to each side for pulling it open (we found the matching ones to my kitchen island drawer) and optionally you can add chain so the door doesn't come all the way down. I'm shorter so we are still debating since I placed this over where my newly painted vanity/coffee cart is. I can't wait to share that tutorial and outcome with you along with all the other kitchen updates as they come!
Now, if you love coffee like we do be sure to see our coffee posts. Or make another project from the list below!
Have you used chalk paint on furniture? Or chalky finish paints for any of your decor projects, crafts, or furniture?
Hi Lauren, Thanks! Glad you like it. It’s freed up some a good space in the cabinets for other things and I love how I don’t have to go back and forth to grab all the stuff to make coffee. It’s near the fridge too.
This is super cute and unique! I love the gold and blue combo. How long did the whole project take?
Hi Sara, Leon built it in a few hours. I painted it in a few hours. When it was dry he hung it. Start to finish we did it on different days but, I’d say it’s a half day project if you have all your materials. More time if you have to run around purchasing supplies.
This is so cute! I think I might use this idea for another room in our house with a different stencil. SUPER CUTE:)
This turned out really cute, i esp love the way you glammed up the inside!!
Wow! This is simply stunning! Thanks so much for linking up to our A Little Bit of Everything Link Up party! We look forward to you joining us again.
Thanks Aimee, It’s not often that I get to linkup and share. Thanks for hosting!
I love that Busy Bee stencil! What a super cute way to store all the coffee and tea essentials!
Hi Gwen, Me too. I actually wouldn’t of tried it but, I fell in love with some fabric that has bee designs and wanted to incorporate the theme into the kitchen. Thanks for the compliment, comment and visit! Hope to see you again soon.


 . Let it dry completely, sand slightly, ensure it's dust-free, and then paint.


Love it! It came out great!
Hi Lauren, Thanks! Glad you like it. It’s freed up some a good space in the cabinets for other things and I love how I don’t have to go back and forth to grab all the stuff to make coffee. It’s near the fridge too.
This is super cute and unique! I love the gold and blue combo. How long did the whole project take?
Hi Sara, Leon built it in a few hours. I painted it in a few hours. When it was dry he hung it. Start to finish we did it on different days but, I’d say it’s a half day project if you have all your materials. More time if you have to run around purchasing supplies.
This is so cute! I think I might use this idea for another room in our house with a different stencil. SUPER CUTE:)
This turned out really cute, i esp love the way you glammed up the inside!!
Wow! This is simply stunning! Thanks so much for linking up to our A Little Bit of Everything Link Up party! We look forward to you joining us again.
Thanks Aimee, It’s not often that I get to linkup and share. Thanks for hosting!
I love that Busy Bee stencil! What a super cute way to store all the coffee and tea essentials!
Hi Gwen, Me too. I actually wouldn’t of tried it but, I fell in love with some fabric that has bee designs and wanted to incorporate the theme into the kitchen. Thanks for the compliment, comment and visit! Hope to see you again soon.