Semi-Homemade Holiday Cards & Giveaway
Dear Creatives, Hi! I’m so excited to be guest blogging for you all today. My name is Anna and I’m a SAHM mom to two young children, 2 years and 10 months, and I am happily married to my best friend. I love all things crafty and homemade and I use my blog to share what I’m doing and what I find inspiring. I hope you stop by sometime so we can be inspired together.
Today I’m going to show you how to make a “Semi-Homemade” Christmas Card. If you are like me, you like to make homemade things or maybe you would like to try to make something homemade, but you just don’t think you are all that “crafty.” Well, this is a quick, cute way for anyone to dress up a boxed set of Christmas cards to give it that homemade touch!
Supplies:
- Set of boxed of Christmas Cards: I got mine from the Dollar Bins at Target
- Embellishments: I used a variety of rhinestones with different colors and sizes
- Ribbon
- Stamps and Ink
- Scissors
- Liquid Adhesive
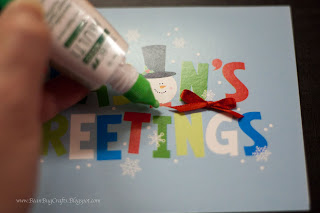
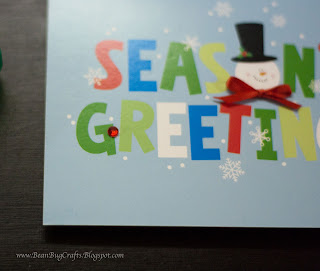
*Decide how you would like to embellish your cards. I think these snowmen cards are cute as is, but I think they needed a little bit more so I decided to add rhinestones and ribbon.
Cut out how many ribbons you will need. I needed eight ribbon to add to the snowman for his bow-tie. They are pretty small, but they are just enough.
Once the ribbons are made, you will need to attach them. I used my liquid adhesive, but you could also use a hot glue gun. Just be careful when working with small ribbon that you don’t burn yourself, I know I always do!
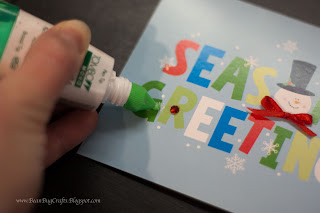
I then added a rhinestone to the center of each snowflake. The rhinestones I have already have an adhesive, but because the cards are going to be handled a lot I like to add adhesive to them just to make sure they stay on.
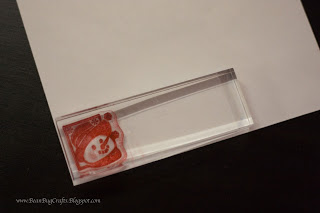
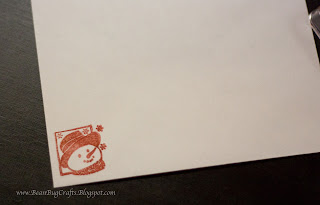
I decided I wanted to dress up the envelopes a bit too. So I used a small square snowman stamp and my red ink pad and stamped the image in the lower left corner.
Thanks for having me! I hope you liked the tutorial and are able to find some boxed cards so you can make them “Semi-homemade!”
Now, how would you like to win a set of eight of the snowman cards I just showed you? Well, here is your chance. Once lucky winner will get a set of eight already “semi-homemade” cards and envelopes.
All you have to do is:
- Like BeanBugCrafts on Facebook Mandatory Entry Comment that you did this for one entry
- Additional Entries:
- Follow BeanBugCrafts on Google Friend Connect
- Follow @BeanBugCrafts on Twitter
- Follow Dear Creatives on Google Friend Connect
- Follow@DearCreatives on Twitter
Comment for each one you did for a total of up to 4 additional entries.
Thanks Again!
Anna @ Bean Bug Crafts Blog
Twitter, and Facebook
Winner will be chosen 1-3 2 am PST & emailed. This has been extended from the original close date!
Giveaway Closed! Thanks to all those who entered!
True Random Number Generator Result: 10
The winner was #10 !






liked you on facebook
i liked beanbug crafts on fb!
i follow with gfc!
I Follow BeanBugCrafts on Google Friend Connect.
[email protected]
I follow @BeanBugCrafts on Twitter-kellybb31
[email protected]
follow@DearCreatives on Twitter-kellybb31
[email protected]
I Follow Dear Creatives on Google Friend Connect
[email protected]
I like BeanBugCrafts on Facebook
LOVE these cards! BeanBugCrafts FB fan as “salady sarah”
BBC GFC follower as SaladforBreakfast
Following @BeanBugCrafts on Twitter @SFBBlog
Following @DearCreatives on Twitter @SFBBlog
DearCreatives GFC follower as SaladforBreakfast
I follow on fb as Kristie J. This is actually a very cute idea! I wish more people did Christmas cards! LOVE IT!
I am one of your FB friends. Thanks for the giveaway.
liked bean bug crafts on Facebook
[email protected]
GFC follow bean bug crafts
[email protected]
follow bean bug crafts on twitter
@sagegiveaway
[email protected]
GFC follow dear creatives
[email protected]
I like you on FB:)
Our winner was Sarah Says #10. We will be mailing Sarah for her information! Congrats Sarah!
Feel free to enter the Cashmere Snowman Giveaway that is extended.
Thanks to all who entered! Stay tuned for more giveaways & fun~