This post contains links to affiliate websites, such as Amazon, and other affiliates. We receive an affiliate commission for any qualifying purchases made by you using these links. This is at no additional cost to you. We appreciate your support!
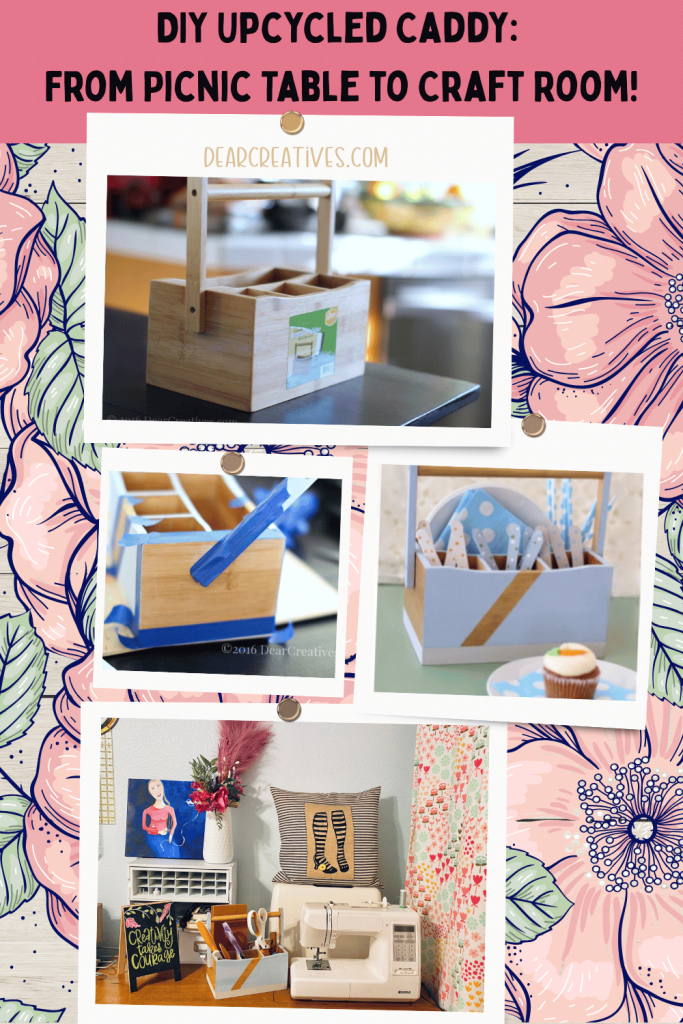
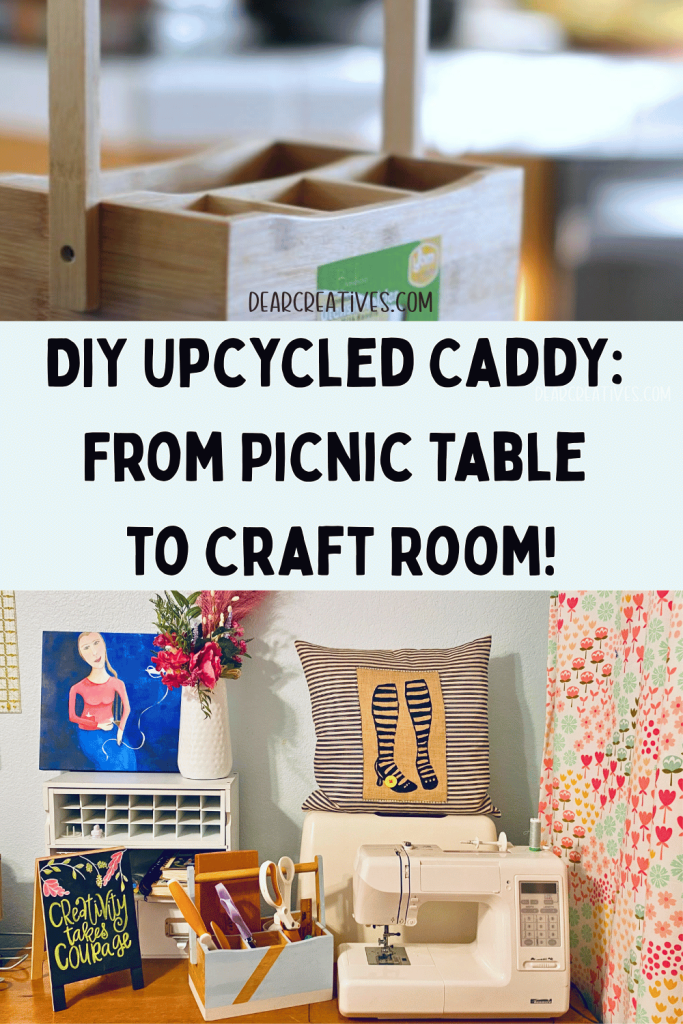
Have you ever tried upcycling a basic wooden utensil holder? The other day, as I started working on my Easter decorations, I came across a simple wooden caddy and knew it had so much potential. In the spring and summer, our family loves spending as much time as possible in the backyard—there is just nothing better than eating outdoors and entertaining friends! I thought it would be such a fun project to paint this wooden holder and give it a much “prettier” look for our seasonal gatherings.
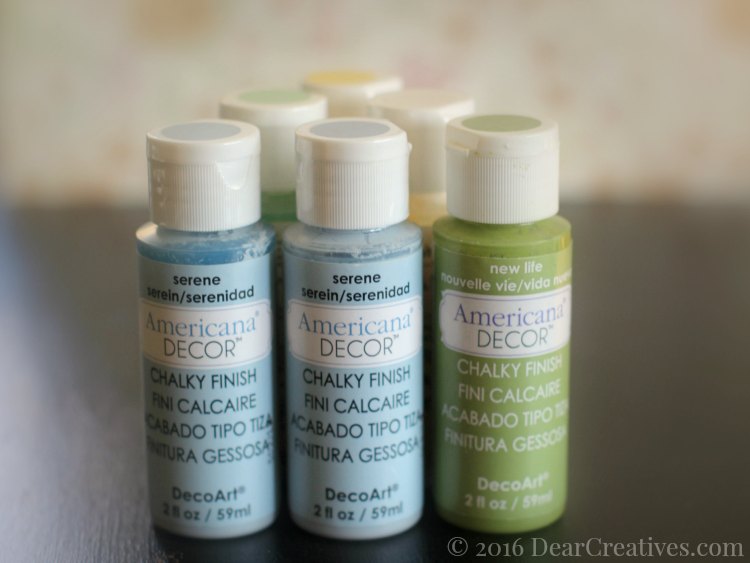
The best part about this DIY is how incredibly versatile and customizable it is. While I’m styling mine for an Easter brunch today, you can easily adapt it to suit any backyard theme or party. You can pick your specific paint colors and style to fit your own home decor perfectly. (I have listed my exact paint colors below in case you'd like to make yours the same!)
When you are done with this DIY—or if you are looking for other Easter inspiration—you can find all our [spring craft ideas here].
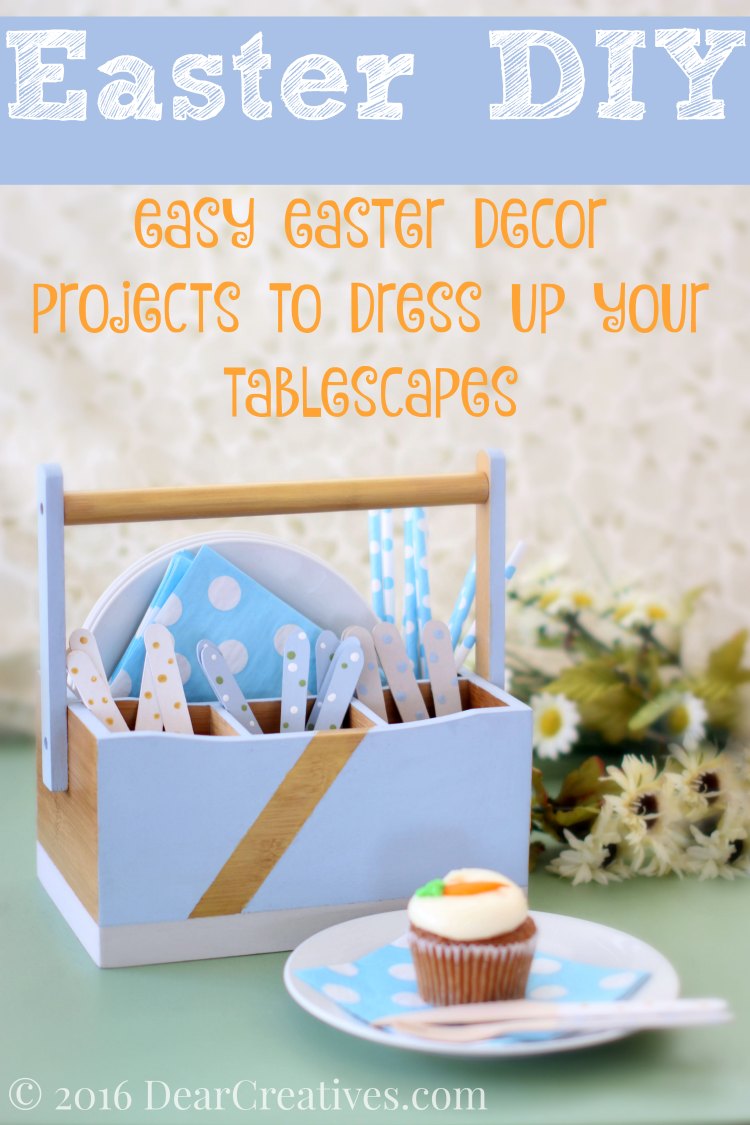
I originally designed this specific holder for our Easter table, but it’s truly a year-round piece. It works beautifully for any table setting, picnic, or holiday gathering, from Mother’s Day and the Fourth of July all the way to Christmas. What’s so handy is that you can use the utensil holder every day if you’d like; I often set mine in the center of the lazy Susan that sits on my dining table. It’s perfect for holding napkins, forks, knives, spoons, and straws.
From Easter Picnic to Sewing Room: Upcycling a Wooden Utensil Holder
Lately, I've even found a “double use” for it by moving it into my craft space! Right now, I’m using it as a sewing caddy to keep my shears, measuring tapes, and pincushions organized while I work on new projects. It’s amazing how one little piece of decor can transition from a kitchen staple to a sewing room essential.
Since we were planning a brunch for Easter, I even decided to paint the wooden handles of the utensils we were going to use to match the caddy. It creates such a cohesive, high-end look for very little effort. I think you'll find this tutorial very easy and, hopefully, it inspires you to look at everyday items a little differently!
5 Creative Ways to Style Your Caddy
The Sewing Station: Keep your fabric scissors, bobbins, and thread within arm's reach.
On the Lazy Susan Centerpiece: A permanent home for napkins and straws on the dining table.
Office Organizer: Tame the desk clutter by sorting pens, staplers, and calculators.
Art & Craft Hub: Perfect for kids' markers, glue sticks, and paintbrushes.
Holiday Hero: Switch up the colors for Mother's Day, Father's Day, or the Fourth of July.
Upcycled Utensil Holder
The DIY Home Decor is easily adaptable to suit your backyard themes, parties, or organizing and craft needs. Pick your paint colors and style to fit your themes. I have listed my paint colors in case you'd like to make yours the same colors.
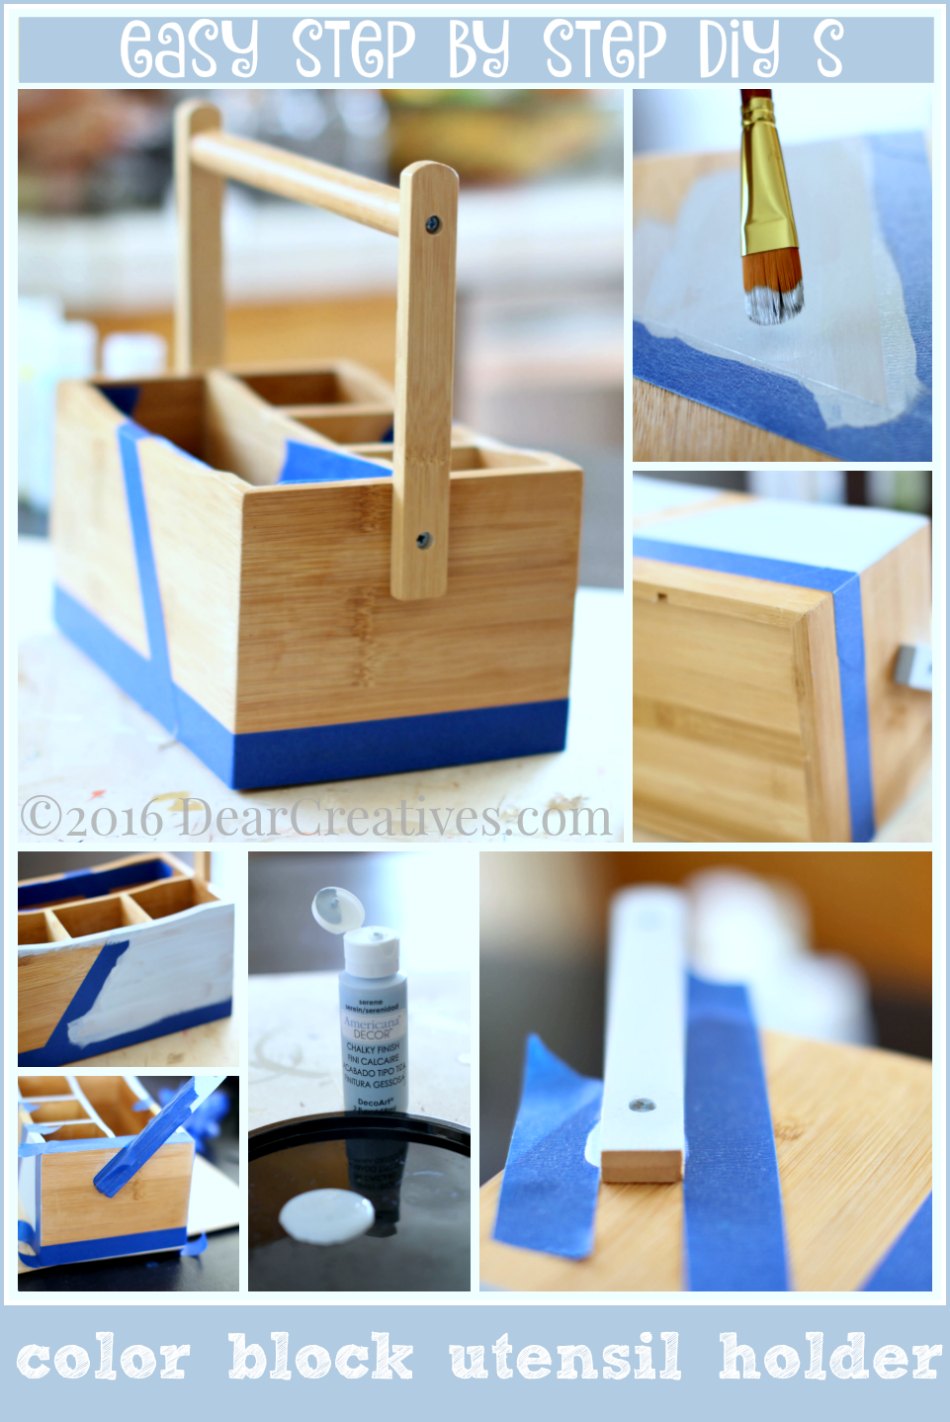
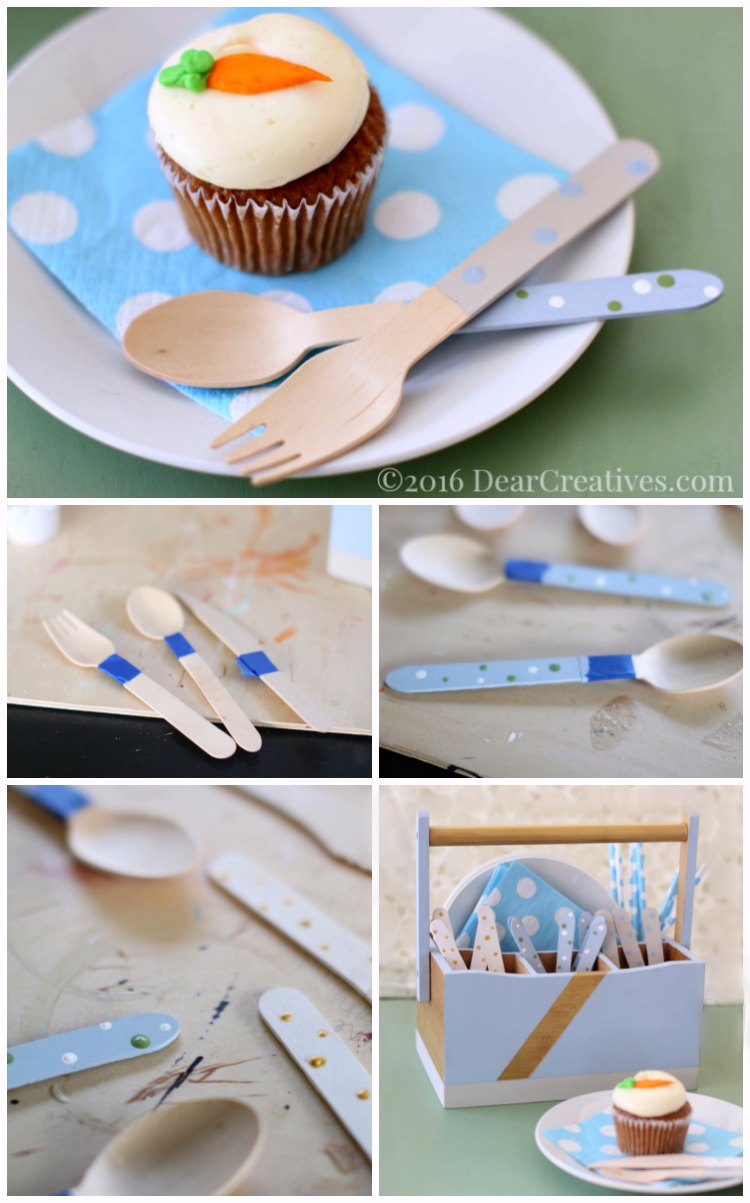
For my upcycled utensil holder, I used a color blocking pattern. This gives it a look that you can use all year long. Then I added the festive polka dot pattern to my wood utensils. (Keeping the paint away from the eating area is essential! No paint should ever be covering any eating areas where your mouth may touch. They will not be reusable. But the products are compostable, and this was quick and easy to do.
You don't have to use disposable items if you're trying to be green. You can use cloth napkins and silverware. I do this for everyday use.
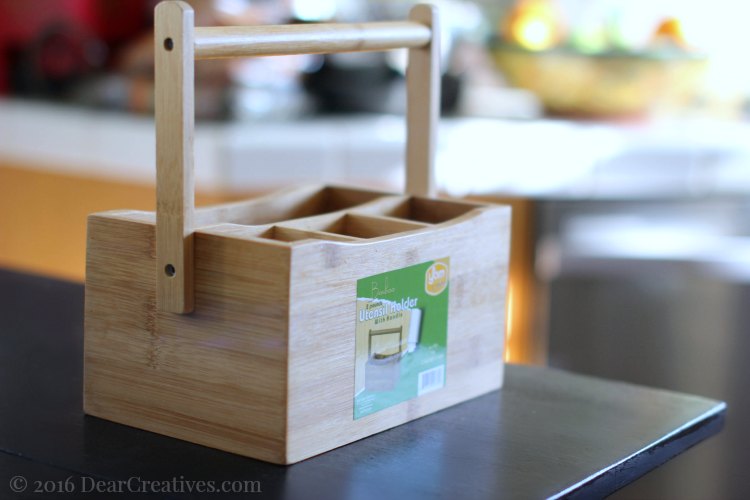
You'll need to take the sticker off your utensil holder if it's new. Make sure to scrub off any glue residue. Sand lightly if necessary.
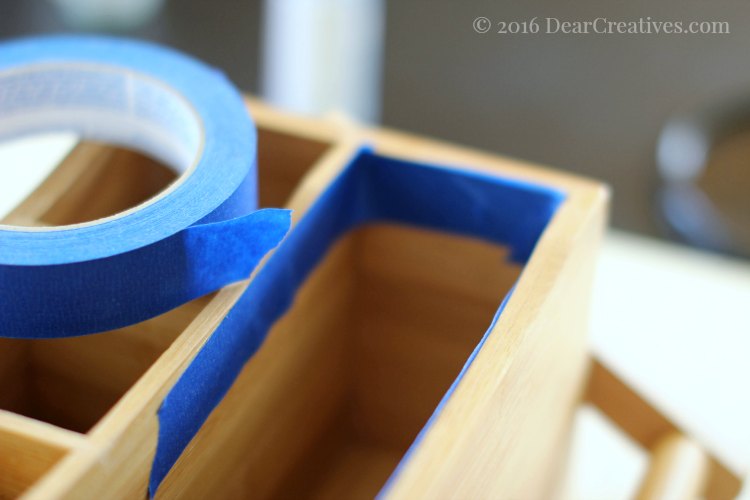
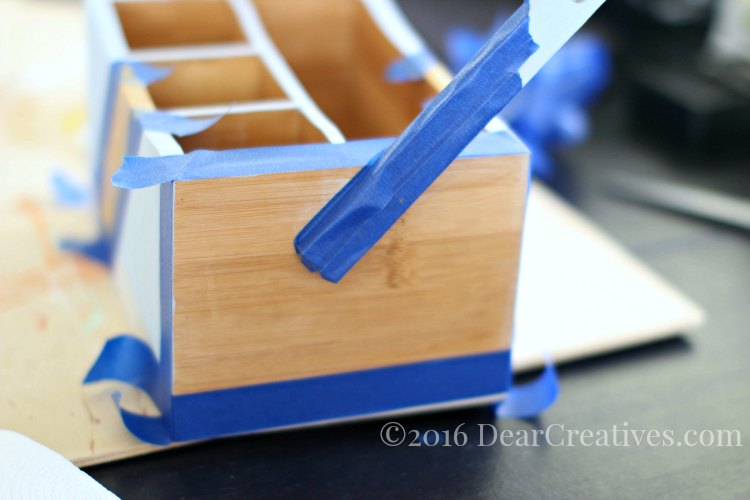
I have to admit, I didn't want to paint the inside of the utensil holder/caddy. If you are good at painting, you can use your flat angle brush and not have to tape it off. If you aren't quite at this level, it's wise to tape off areas you don't want to have painted. I used painter's tape for the rest of my project and will show you how to.
Tip:Have a clean, older cloth or towel that is damp nearby to wipe off any mistakes right away!
How to paint a color block design
Upcycled Utensil Holder Steps
Tape off areas (inside if needed) Diagonal line on both sides, and bottom line around the entire caddy
Paint with blue chalk paint (serene)
NOTE:Do not paint the ends of the caddy on each side! If you need to tape this off, do so.
Let dry
Next, tape off next to the handles. Paint with blue chalk paint on the outsides only and let it dry
Remove all tape
Tips for Painting a color block style
Next, I taped off any blue areas I didn't want gold and proceeded to paint the gold with two coats, allowing for dry time between coats. Dry time is quick if your house is warm. You'll have to rotate the handle when painting underneath it; you might have to wait for one side to dry and go back.
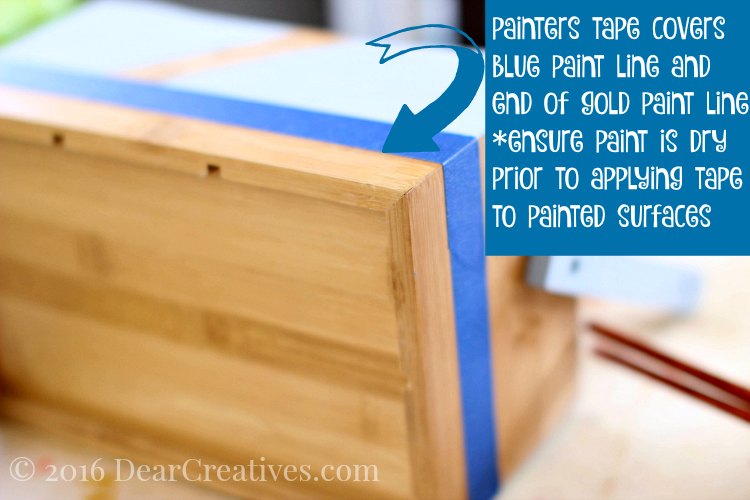
NOTE: Do not tape off painted areas unless they are completely dry!
I painted the handle, ends of the caddy, diagonal line, and the inside of the handles gold.
Lastly, paint a primitive grey strip all the way around the bottom of the caddy. This is why you see the painter's tape on the bottom in the first DIY section covering where grey will go. You will remove that tape before painting the grey area. Then, when the paint is dry, apply painter's tape at the base of already painted areas. As shown in the image above. Let the paint dry completely and touch up lines as needed. Using an angled brush for lines and corners is best!
DIY Easter Decorations
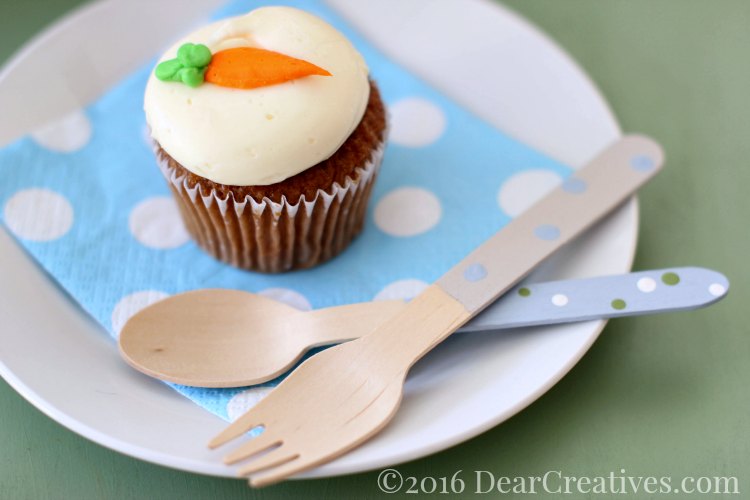
How to Paint The Wood Utensils
Since we were planning a brunch for Easter, I even decided to paint the wooden handles of the utensils we were going to use to match the caddy. It creates such a cohesive, high-end look for very little effort. I think you'll find this tutorial very easy and, hopefully, it inspires you to look at everyday items a little differently!
It's really quick to paint the handles of the wooden utensils!
Can you paint wooden utensils?
Do not paint any area you will eat from!
You can paint the handles, but not the areas you will eat from. Be sure to keep any paint away from the mouth bite area.
Tape off close to the end of the utensil in the eating area
Give each utensil a quick coat of the chalk paint. I used a different color for the fork, knives, and spoons
Let dry
Take the end of your paintbrush and dipit into the paint, make dots with the paint (they dry flat)
Note: When changing colors, wipe the end of your brush clean before adding new paint color
Make them as festive as you like. I did three different styles
Now you are ready to have any brunch celebrations or picnics in style! What chalk paint colors would you paint your utensil caddy?
If you have any questions, just ask by tagging me @DearCreatives on social media! I'm happy to help.
Beyond the Kitchen: Creative Ways to Style Your Caddy
If you want to get even more use out of this project, here are a few of my favorite ways to repurpose it around the house:
Office Organizer: Keep your pens, scissors, and calculators tidy on your desk.
Art & Craft Station: Perfect for sorting markers, paintbrushes, and glue sticks for the kids.
Sewing & Craft Organizer: Ideal for sewing shears, pattern scissors, rulers, and seam gauges.
Garden Tool Tote: Carry your trowel, gloves, and seed packets out to the flower beds.
Coffee Bar Companion: Organize your stirrers, sugar packets, and napkins for a clean morning setup.
Bathroom Vanity Caddy: A chic way to hold hairbrushes, lotions, or makeup palettes.
How to Style Your Upcycled Utensil Caddy Year-Round
While this project is perfect for Easter and Spring, the neutral chalk paint colors make it incredibly versatile. Here is how you can quickly switch up the look for other holidays:
Mother’s Day: Swap the Easter grass for moss or floral foam and fill the compartments with fresh peonies or roses. It makes a stunning centerpiece for a Mother's Day brunch!
Father’s Day / Summer BBQ: Use the caddy to hold heavy-duty napkins, steak knives, and bottles of hot sauce or BBQ rub. The “Serene” blue fits perfectly with an outdoor summer patio vibe.
Christmas / Winter: Fill the caddy with sprigs of evergreen, red berries, and white birch sticks. You can even wrap a bit of red-and-white baker's twine around the handle for a festive touch.
Everyday Kitchen: Keep it on your counter to organize frequently used wooden spoons, whisks, and spatulas. It adds a touch of farmhouse charm to your daily cooking routine.
Be sure to subscribe to all my upcoming crafts and add us to your inbox. Never miss out! Planning on making, painting, or crafting? You might like this fan-favorite and my favorite Folk Art acrylic paint set.
Today's post is brought to you by DecoArt. I'm one of their core bloggers. You can find many of my projects here on DecoArt's site, along with other bloggers/artists and crafters. Or right here on my site by viewing DIY and craft galleries.
So cute and festive! My daughter would have so much fun working on these projects with me 🙂
Hi Sonali, Thanks for stopping by. Yes, it’s fun to include the kids. Mine was at school when I painted on this day. But, when I have them out she usually likes to do a project or help too. I’d love to see it if you get out some paints to do one.
What a super cute idea!!! I host Easter every year so I think I’m going to give the utensil holder a try!
Hi Phyllis, Thank you. You should it’s super easy and a fun project. Share it if you paint one!
Oh my gosh this is awesome!! I pinned this one since I would love to try and create something like this!
Hi Lauren, You can easily make one. Hope you do! Be sure to share it with me if you do.
These are absolutely adorable and perfect for giving your Easter table an extra special touch!
Thanks Bev! For stopping by & the complement. Take time to paint one!