How to Make a Fabric Banner (Easy Sewing Bunting Tutorial)
If you’re looking for an easy sewing project, this tutorial will show you how to make a fabric banner (also called bunting). Fabric banners are simple to sew and can be customized for birthdays, holidays, nurseries, parties, or everyday home decor. With basic sewing skills and straight stitching, you can create a handmade decoration that adds charm to any space.
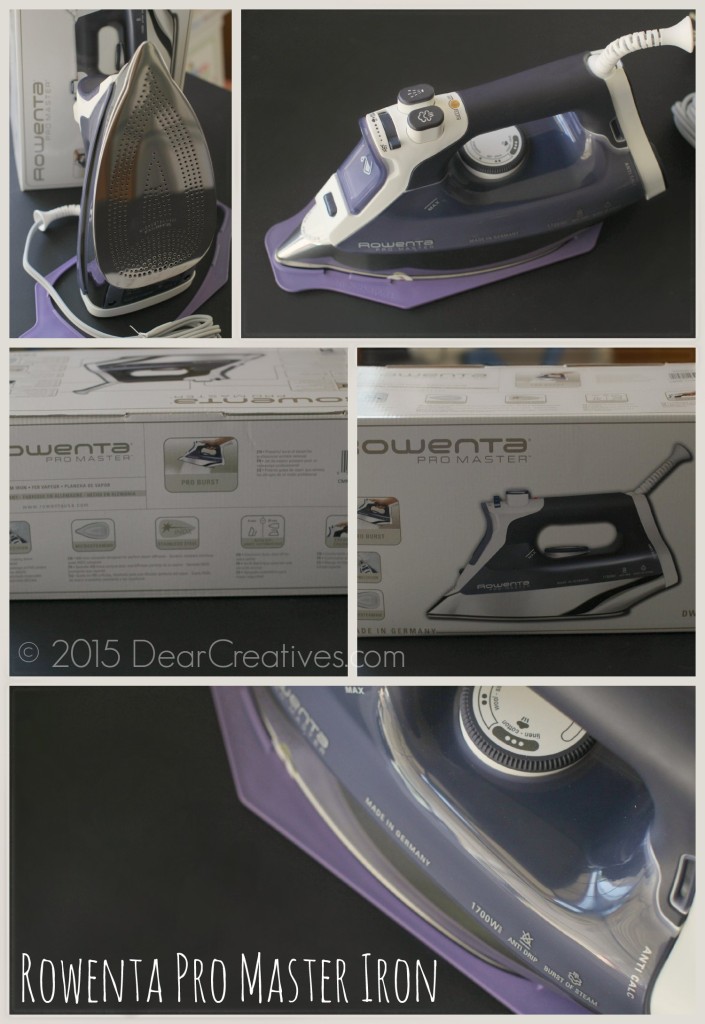
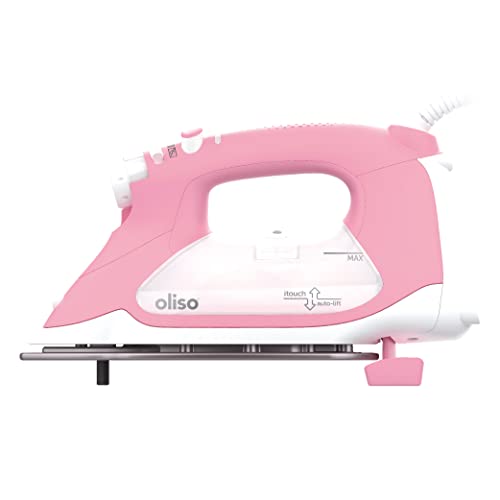
One of the secrets to getting professional-looking results? Pressing your fabric well. A good iron makes a big difference when sewing crisp banner pieces. I used my Rowenta Pro Master iron for this project — an iron I’ve been using and loving for over 11 years. If you sew regularly, you know certain tools become your BFFs.
This post has been updated with additional helpful tips and step-by-step guidance to help you confidently make your own fabric banner.
Looking for more sewing inspiration? You might also enjoy this babydoll tank top sewing project or a kid's tote bag. Browse all of our latest sewing tutorials for more ideas.
This banner is a great beginner sewing project because it uses straight seams and simple construction. You don’t need a pattern — just cut, sew, press, and hang!
I like to pre-wash and dry my cotton fabrics this way if I need to wash them later, so there won't be shrinkage and ruin the sewn project. Allow the time to do this before starting the project.

When creating a banner, you'll have to decide how big you want it. I made mine bigger as I'm adding it to my next project, a teepee. You can use a quarter yard to half a yard of fabric, depending on how many banner flags and the size of the banner flags you make. I included a link to a banner template, but you can find a variety of sizes and styles for free templates by searching online.
Materials Needed to Make a Fabric Banner
- Cotton Fabric Half a Yard (wash and pre-shrink)
- Thread in matching color
- Sewing scissors
- iron
- An ironing board or a protected surface to iron on
- Sewing machine
- Seam ripper (if your newer to sewing)
- String, jute rope, or ribbon for the length of your banner plus hanging. (2 ft. – 3 ft.)
- Printable template for banner (find the link to the PDF template in Step 1 of the directions), or search for a free template of the size you would like. Or use a ruler and draw your own template on cardstock or cardboard.
- Straight pins
- 1 large Safety Pin
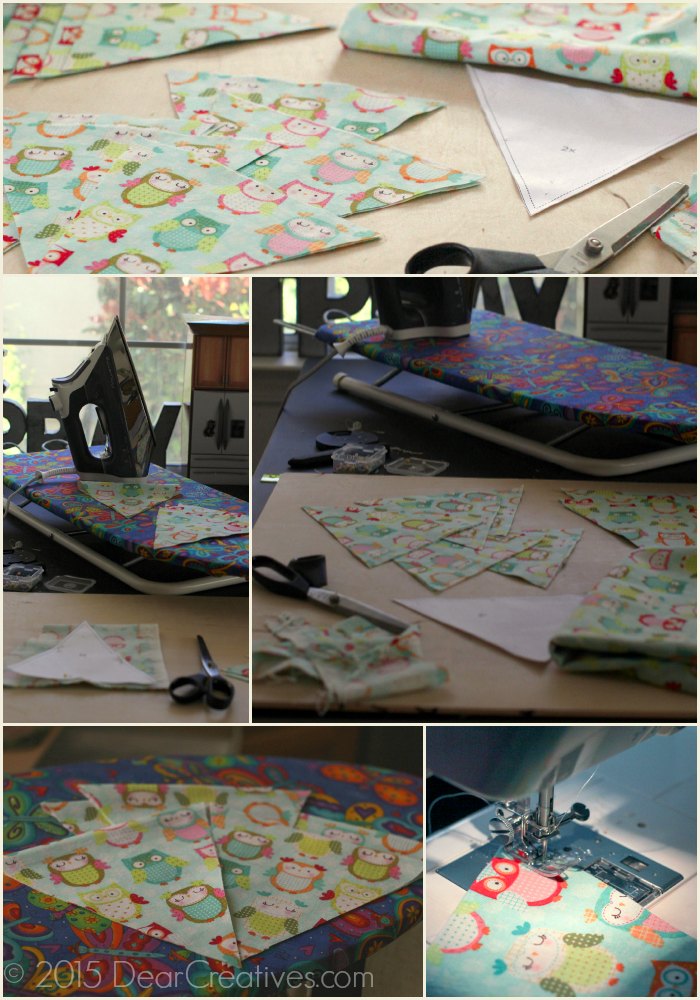
Cutting Fabric for Bunting
Tips for picking your fabric
Best Fabrics For Fabric Banners and Fabric Buntings: Cotton fabrics are good for projects like this! Burlap and linen are other options.
Fabric Pattern Directions Matter: Please note that for certain fabrics like this one, the fabric is all in one direction. Folding your fabric this way for cutting will create an upside-down version of the pattern on the opposite side. For one-direction prints, lay the banner pattern down without folding the fabric! (Double check yourself before cutting to make sure the fabric is how you want it.)
Video For Selecting Directional or Non-Directional Fabrics
Steps For Making And Sewing a Fabric Banner or Bunting
If your banner flags are not cut on the seam, scroll down to see how to join them before moving to these steps.
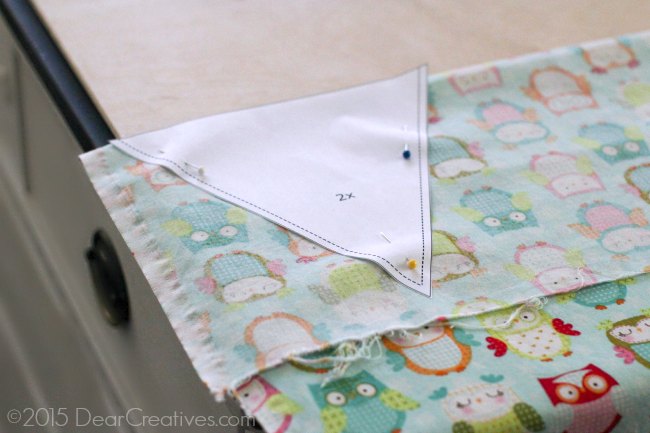
- Get out the banner template.
- Iron your pre-washed fabric.
- Lay it flat on the table.
- Cut out 6-12 banner/bunting flags.
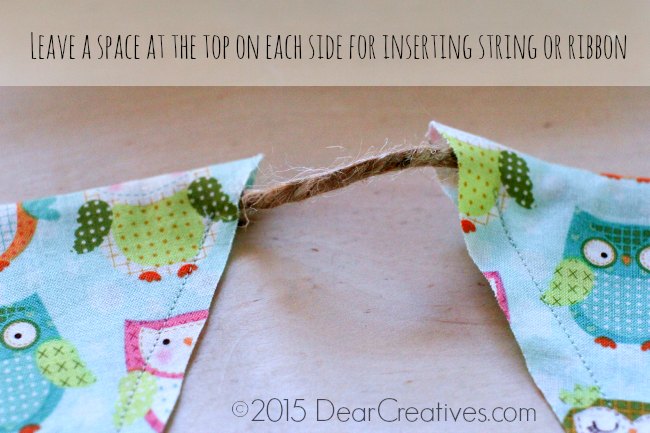
- Sew banners, leaving an opening at the top of each side. Go forward, stop, then reverse to begin or end, securing your stitches. Note for our banner project: leave a 1/2-inch space before starting or stopping the ribbon opening!
Sewing the Banner Pieces
Tips for sewing the banner pieces and allowing space for the ribbon
- Start past the opening for the ribbon spot. 1/2 inch below the top of the banner/bunting.
- Stop with the needle down in the fabric.
- Lift the presser foot and pivot. Now you will go on sewing up the other side, stop early for the ribbon hole (again, 1/2 inch before the top of the banner).
- String jute rope or ribbon through the banner opening using a safety pin or other stringing tool.
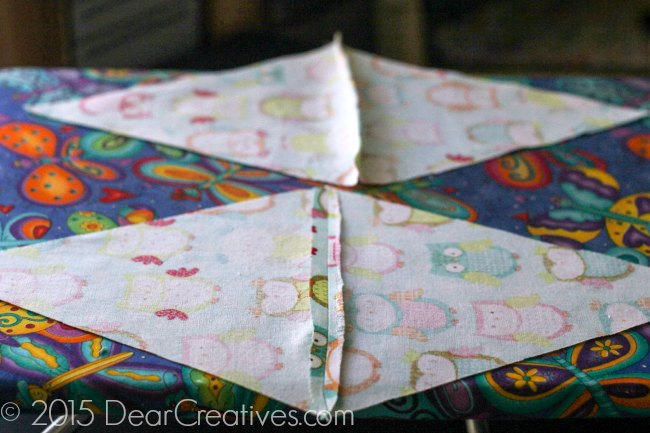
Pressing & Finishing the Edges
Connecting the banner/bunting triangles if not cut on the seam.
If you have cut two banner/bunting pieces, you need to join them. Meaning you did not cut your banner pattern on the fold. Follow these steps before you head over to the above Sew Banners!
- Sew fabric banners together at the top with stop/start joining by sewing straight across with right sides together. If you want finished seems view the video tutorials.
- Iron open seams (shown in the image).
- Next, trim edges as needed.
- You'll see what needs trimming when you fold the banners closed and match them up.
- Iron again, sew the seam is flat!
- Then follow the directions above.
You can see where the fabric is not sewn at the top of each side of the banners for slipping the string or ribbon in (in the image below). I hope this helps you get started on your own banner.
If you want your edges finished, see the videos below. Plus, it gives you a few more options for how to make them.
Tools I Used (Iron Review)
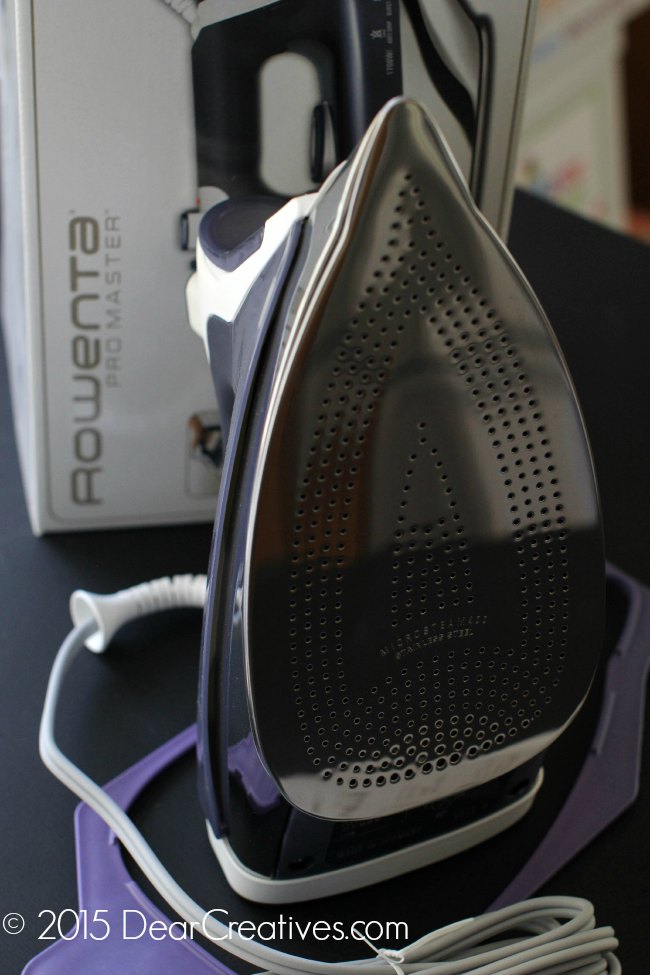
This is the Rowenta Pro Master Iron I used for the project! Isn't it a beauty!! Find my full review below.
It's a great beginner sewing project and an easy sewing project!
How to Hang Your Fabric Banner
Stretch out your banner flags and string, hanging it centered, and use command strips or thumb tacks to secure each end.
Whether you hang your banner over a fireplace, in a nursery, over a party table, or as seasonal decor, fabric banners add charm. You can use dowels, curtain rods, Command hooks, or decorative twine.
FAQ: Sewing a Fabric Banner
What fabric is best for making a fabric banner?
Quilting cotton works great for fabric banners because it’s easy to sew and presses well. You can also use linen or lightweight home decor fabric for a more textured look.
Do I need interfacing for bunting?
Interfacing is optional. If you want your banner to be more structured or hang flat, adding lightweight fusible interfacing can help.
What size should fabric bunting triangles be?
Most fabric banner triangles are between 5–8 inches wide and 6–10 inches tall. You can easily adjust the size depending on where you plan to hang the banner.
How do you finish the edges of a fabric banner?
You can sew two fabric pieces right sides together and turn them, use pinking shears, or finish raw edges with a zigzag stitch or serger.
Can I wash a fabric banner?
Yes, if you use washable fabric and thread. For best results, gently wash and press after drying.
I also have the review for the iron after the videos!
- New here? Be sure to Subscribe.
- Pin it for Later
- Follow us on Pinterest
- Shop our favorites on Amazon
Video Homemade Bunting With Finished Edges
Video for how to Sew a Baby Bunting
I hope you get to make a banner soon! Banners/buntings are great for baby, kids' rooms, showers, and wedding parties.
Be sure to ask any questions about the iron or banner instructions. I'm happy to help. If you need a banner template, visit my Pinterest sewing projects board to grab one! They'll be easy to find on the board, along with other easy sewing projects.
Iron Used for This Project (11-Year Review)
I’ve been using this iron for over 11 years, and it’s still performing well…

My thoughts on the iron
- Let me tell you, when I lifted it, it was heavier than the iron I was used to. (My old iron wasn't of as good a quality)
- The Rowenta is not too heavy for ironing with; it makes it a breeze.
- It has a long cord, which I love! Perfect for reaching around your ironing board and projects.
- It has an auto on-off.
- 400 Power holes! The power steam feature is amazing! Power steam, spray steam, anti-drip, and all the settings you'd ever need.
- Plus 1700 W of power, precision tip, and self-cleaning! Can you hear the sewing angels singing?
- Rowenta Pro Master. I highly recommend this iron for not only sewing, but if you have any type of shirt, suit, or dress, pressing with this iron is one you'll love to use! This is my 100% honest opinion. With all the ironing for sewing and other things I do.
I hope you enjoy ironing with it as much as I have if you decide to purchase one!
Rowenta Pro Master Iron Features
- Professional-grade 1700-watt steam iron with 3-way automatic shut-off, 400 Steam holes!
- Variable steam, burst of steam, vertical steam, and cool mist spray options; anti-drip and anti-calc systems; self-cleaning
- Highly polished stainless-steel soleplate with high-precision tip; full metal shield; ergonomic covered handle
- Soft touch handle provides comfort and a non-slip grip
- Soft-touch buttons offer superior control
- Vertical steam allows iron to be used in the upright position for drapes and hanging garments
- Variable steam settings offer flexibility when ironing a variety of fabrics and thick layers at seams and waist bands
- The anti-slip frame provides extra stability when the iron is on its heel
- The anti-drip system prevents spitting and leaking when the thermostat is on a low temperature setting
- 3-way auto shut-off feature turns the iron off in 8 minutes if vertical, 30 seconds if horizontal or tipped over
- Iron self-cleans, removing loose mineral deposits and impurities to be flushed out
- Made in Germany; 1-year warranty
- Want a closer look? Or consider purchasing? Rowenta Pro Master Iron
Have you ever sewn a bunting or banner before? How long have you been sewing?
- New here? Be sure to Subscribe.
- Pin it for Later
- Follow us on Pinterest
- Shop our favorites on Amazon
Browse all of our latest sewing tutorials for more ideas.

- New here? Be sure to Subscribe.
- Pin it for Later
- Follow us on Pinterest
- Shop our favorites on Amazon
This is a very cute project! I have a sewing machine that I haven’t used in years. I think I could handle sewing a banner for Eve’s room, though!
Thanks Bev! It’s easy all straight stitching. You can cut them out while watching tv or Eve playing then sew up when shes napping. it’s super quick to do. I need to edit a picture of Sammie holding it so you can see the full banner. I’ll update it or share on FB soon! Thanks for popping in!
This is an easy way to add to any theme for a party since all you need to do is find a coordinating fabric. I need to sew more. I don’t iron much…whoops.
Hi Nessa, Yes, It is an easy way for themed parties, nurseries or kids rooms. I mostly iron for sewing or if I have a shirt or skirt to iron for a special occasion.
This looks like it’s easy enough for even a beginning sewer like me to do. I bought a machine off of Amazon and it’s been sitting in my entryway for almost two months. I finally got it unpacked and completed 3 panels of the curtains I’ve been trying to create. These banners are cute, I could probably use some of my leftover fabric for them.
I’m sure you could Adrian. That’s great you pulled it out. I hope you share them on your blog sometime I’d love to see how they turned out. Sewing can be such a great skill to have. I’ve been sewing more lately. The best part is the more you sew the better you get.