Holiday Ornament Tutorial
This post contains links to affiliate websites, such as Amazon, and other affiliates. We receive an affiliate commission for any qualifying purchases made by you using these links. This is at no additional cost to you. We appreciate your support!


(more examples at bottom of post)
 You can see I chose Santa for the front and checker paper for the back side-
 I trimmed the edges of the white off the paper for only my image-
 Trimmed Santa

 Cut cardboard to the same size as the ornament you are making-
 I took the checkered paper and allowed for overlay-
 I used the bone folder to smooth over edges to front, don’t worry the Santa will cover up the front and these won’t show! I fold over prior to spraying to have folds made so securing to adhesive is quick and goes smoothly **If your cardboard has images cover with gesso or white paint and let dry or blow dry prior to securing paper on!
 I use the paper adhesive to spray on the paper lightly and cardboard! As you can see from the photo below I don’t spray the fold over sides until the back surface is adhered!** Ensure your room is well ventilated and that you have wax paper or something protecting your table surface or do it in a garage or outdoors weather permitting!
 First I affixed the cardboard to the checkered paper and smoothed it out for no wrinkles, then I turned it over to secure fold over edges: spray edges fold down and smooth out.
 Now I sprayed the rest of the cardboard with the folded edges and laid my Santa image on top.
 Then I smoothed out the paper securing it to the card board. It dries very quickly. Don’t worry if you have a little overhang if you are covering with ribbon, twine or other. If you have overhang and aren’t covering with ribbon carefully trim any excess ensuring you aren’t cutting too much and getting too far into your image or plan out your ornament for more accuracy- meaning that you have measured and cut equally to start.
 You can get seasonal brads from Michaels, Walmart or any craft store-
 With your hole punch add a hole where you would like it to hang from- **But adhere any outside ribbon you are adding prior to adding your loop to hang from and then your brad! See below~


 You may cut out different images ( if you are reselling insure there is no copyright!! ) You may cut different shapes. This is just a basic easy to do ornament for anyone. Including doing it with children if you are helping them~ If you use this tutorial do post an image link to what you have made in the comment section as I would love to see. For images you can find two free image sights at the bottom of the blog! Feel free to share a link to the tutorial with credits to me!
* Thin recycled cardboard ( from cracker or cereal box )
* Gesso or white paint
* Images printed on Card Stock or old postcards or old Christmas card images ( 2 locations for free images at bottom of blog if printing your own )
* A bone folder or something to press and smooth with
* scissors and a paper cutter ( or just one of those items )
* brads
* ribbons ( some textured and thicker, some thin for hanging )
* Christmas paper or any other scrapbook paper
* Easy Tack by Krylon
* Wax paper
* pencil for marking cuts if using only scissors
* hole punch
* hot glue gun and glue sticks
* or glue that dries clear
*tweezers
 You can see I chose Santa for the front and checker paper for the back side-
 I trimmed the edges of the white off the paper for only my image-
 Trimmed Santa
 Cut cardboard to the same size as the ornament you are making-
 I took the checkered paper and allowed for overlay-
 I used the bone folder to smooth over edges to front, don’t worry the Santa will cover up the front and these won’t show! I fold over prior to spraying to have folds made so securing to adhesive is quick and goes smoothly **If your cardboard has images cover with gesso or white paint and let dry or blow dry prior to securing paper on!
 I use the paper adhesive to spray on the paper lightly and cardboard! As you can see from the photo below I don’t spray the fold over sides until the back surface is adhered!** Ensure your room is well ventilated and that you have wax paper or something protecting your table surface or do it in a garage or outdoors weather permitting!
 First I affixed the cardboard to the checkered paper and smoothed it out for no wrinkles, then I turned it over to secure fold over edges: spray edges fold down and smooth out.
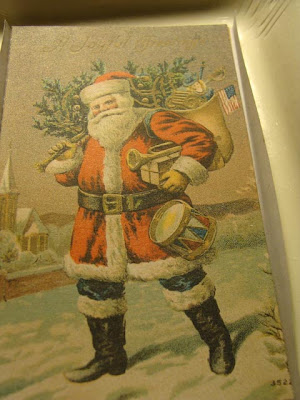 Now I sprayed the rest of the cardboard with the folded edges and laid my Santa image on top.
 Then I smoothed out the paper securing it to the card board. It dries very quickly. Don’t worry if you have a little overhang if you are covering with ribbon, twine or other. If you have overhang and aren’t covering with ribbon carefully trim any excess ensuring you aren’t cutting too much and getting too far into your image or plan out your ornament for more accuracy- meaning that you have measured and cut equally to start.
  You can get seasonal brads from Michaels, Walmart or any craft store-
 With your hole punch add a hole where you would like it to hang from- **But adhere any outside ribbon you are adding prior to adding your loop to hang from and then your brad! See below~
I used a hot glue gun and carefully placed the outside ribbon on a section at a time as to adhere it to exactly where I wanted. (You can use tweezers to aid holding it in position to keep from burning your fingers!) After the outside ribbon is attached add your second ribbon choice through your hole and then your brad and you are done.


 You may cut out different images ( if you are reselling insure there is no copyright!! ) You may cut different shapes. This is just a basic easy to do ornament for anyone. Including doing it with children if you are helping them~ If you use this tutorial do post an image link to what you have made in the comment section as I would love to see. For images you can find two free image sights at the bottom of the blog! Feel free to share a link to the tutorial with credits to me!
 Happy Creating- PS you can do this any time of year with seasonal images!

