DIY Christmas Countdown Sign: Easy Chalky Finish Paint Project
Are you ready for a festive and rewarding holiday craft? Today, I’m sharing a complete tutorial for this beautiful DIY Christmas Countdown Sign using Chalky Finish paint! This project provides a step-by-step guide to creating your own custom holiday decor.
I encourage you to take this idea and add your own creative spin to match your home's style! This countdown sign is a fun, easy project that you'll love setting out every December. It’s truly a special piece. Let’s grab our supplies and get this Chalky Finish project started!
I encourage you to take this idea and add your own creative spin to match your home's style! This countdown sign is a fun, easy project that you'll love setting out every December. It’s truly a special piece. Let’s grab our supplies and get this Chalky Finish project started!
Supplies
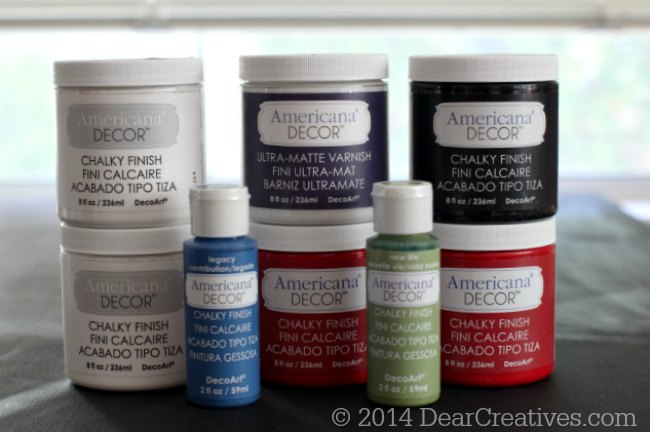
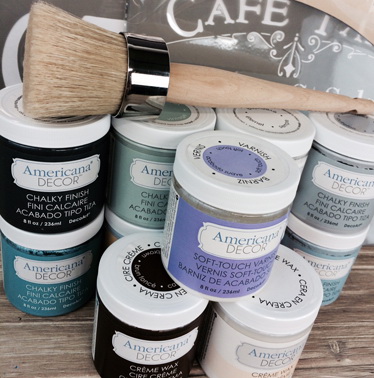
Before we dive into the steps, you'll need to gather your materials! The Chalky Finish paint used in this project is generally available at craft stores like Michaels in the wood and finishes aisle, or you can find other color options from the DecoArt Chalky Finish line online. Remember, you can always choose your own custom colors!
Paints and Tools
- A few paint brushes (assorted), such as a two-inch paint brush (this one is angled) and an angled brush.
- Painters Tape
- Base Wood Plaque, such as ArtMinds ™ Rectangle Wide Edge Plaque Item# 10155126
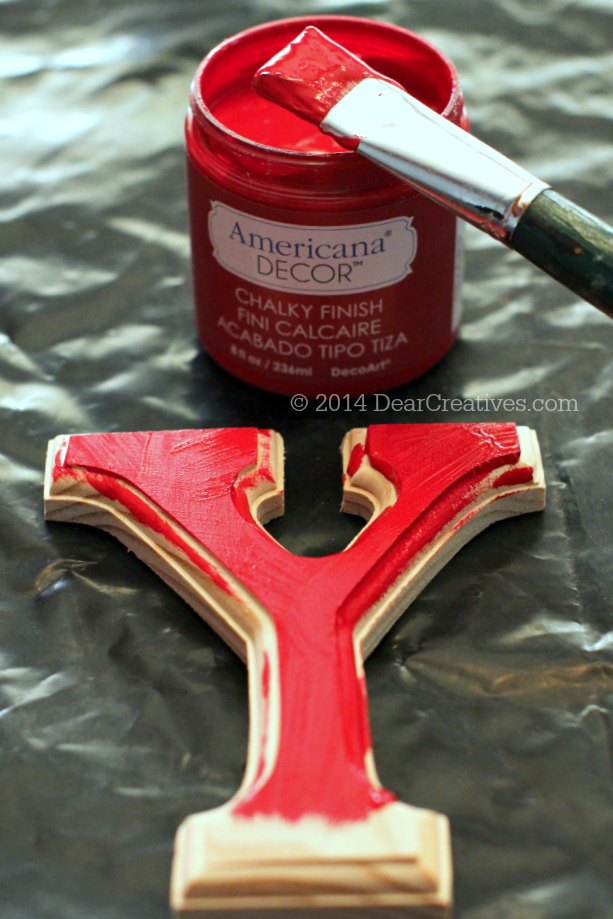
- Americana Decor Chalky Finish Paint (colors I used were: Everlasting, Romance (rouge is similar!), and Carbon)
- Glitter Paint Writer-DecoArt Craft Twinkles Writer Gold/ or Oro
- Chalk Pen Gold or White. Chalk Pen Set: This set comes with gold, white, and silver.
Optional tool if you bore the holes for the pegs: Optional drill press, 5/8″ boring drill bit.
Wood Craft Supplies
- Holiday-decorated, gold mini clothespins, or glittered mini clothespins
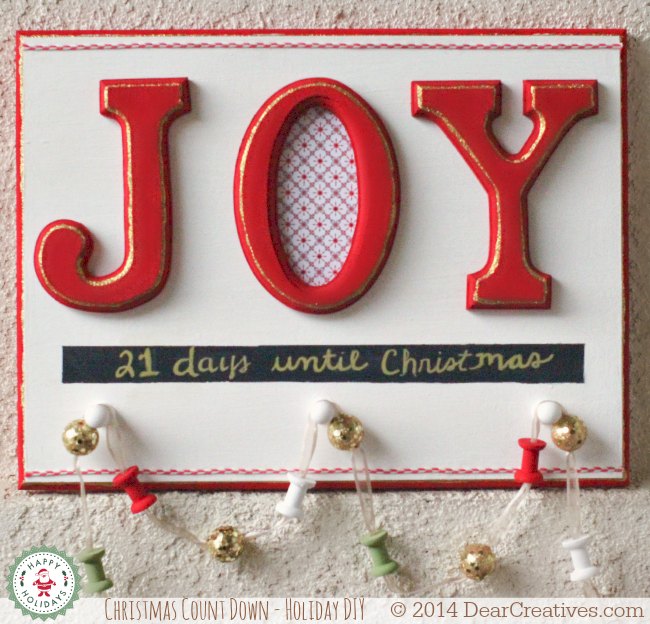
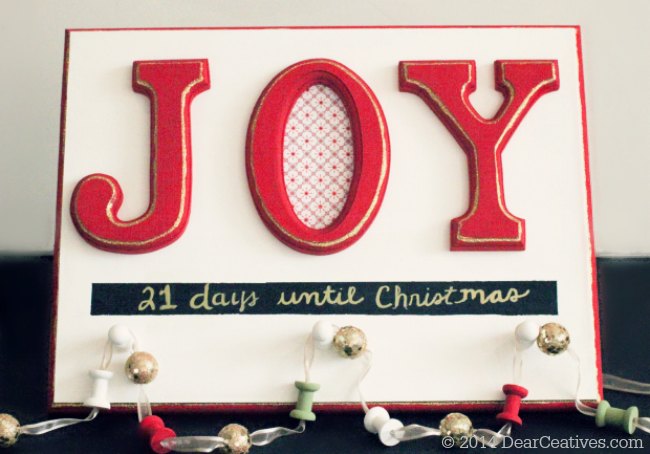
- Wood Letters J, O, and Y (for words)
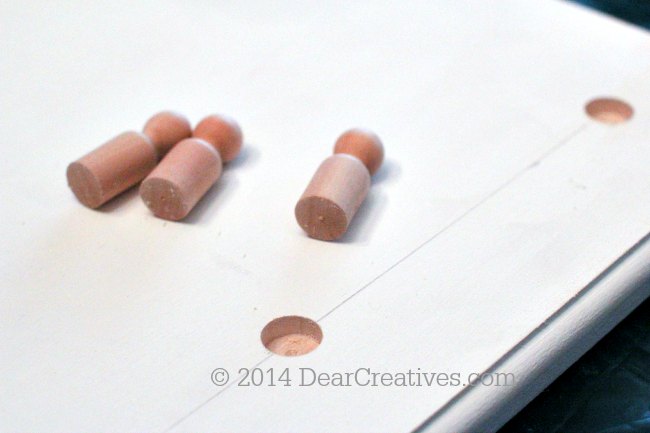
I found mine at the craft store, but sourced something similar. - Wood Pegs: These are similar to mine: Lara's Crafts® Wood Game Pieces, Boy, 5/8″ X 1 11/16″ Item# 10110928 (to hang garland)
- Unfinished Wood Panel (for sign)
- Wood Mini Spools (for garland)
- Wood glue
Ribbon and Hanging Supplies
- Glitter Ribbon Item# M10217109 (similar glitter ribbon)
- Optional twine, red and white holiday string (for the Christmas trim)
- Command Strips for Hanging
How To Make Your Christmas Countdown Sign
Step-by-Step Instructions: Making Your Countdown Sign
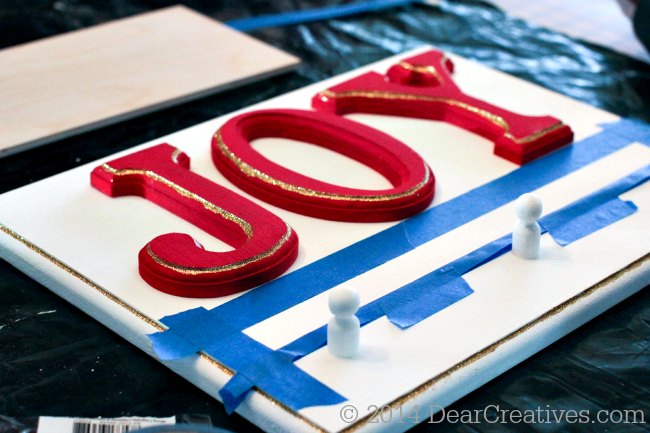
Paint the letters with chalky finish and let them dry between coats.
- Paint all but the back of your Base Wood Plaque with Everlasting Chalky Finish paint – let dry or dry with a heat gun
- Paint the wood letters JOY in Romance, two coats, let dry in between coats
Painting the gold highlights, marking holes, and boring holes
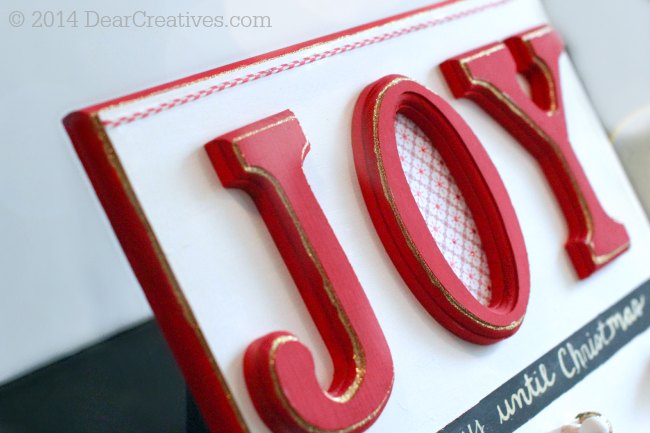
- Take the Glitter Paint Writer (gold glitter/glue paint) and paint along the edges of the rectangle plaque and each letter JOY, let dry completely!
- Mark in pencil lightly where you will place the letters, about 1-1/2 ” from the top, and mark the bottom pegs (placement).
- Bore with drill three holes for pegs and wood glue inside (optionally glue to wood without drilling).
Painting the pegs and spools
- After the pegs are dry, paint them with Everlasting and touch up as needed
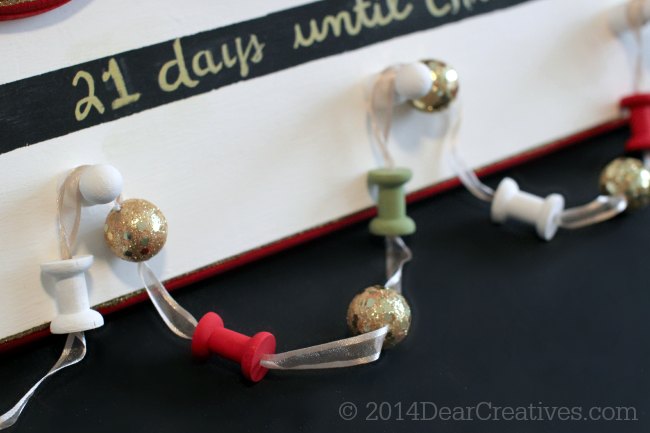
- For Charbon / Count Down Lettering area*I measured halfway between the wood letters JOY and pegs
- If you are threading spools for the garland. Paint them and let them dry. (or buy them pre-painted).
Making the message space to write the countdown days to Christmas
- Use a ruler and draw a skinny rectangle for the message, then place tape on lightly drawn lines.
- Paint with Carbon, let dry, and pull off tape, touch up as needed with an angle brush.
- Next, trace an oval shape onto holiday stock paper and cut out a place behind O, leaving a small wood area not covered with paper to allow for glue on both paper to wood and glue to wood contact.
Adding trim or embellishing is optional
I decided to add a little trim across the top. A girl has a right to change her mind! Right? A lot! Right!? I glued it right onto the wood. It gives it a little peppermint flair. Should I go all the way around? I may have just enough trim. I had a vote, and we are a house divided with the trim. Be my tie breaker!
Gluing the letters down, stringing the spools, and finishing the Christmas countdown sign
- Next, glue all letters down with wood glue (including the stock paper under O and let dry
- Paint around edges of rectangle with Romance let dry (this can be done before gold/glitter paint! Be careful not to get on white if you do it this way)
- Cut ribbon, make a garland with the painted chalky spools and glitter balls. Then place mini closepins onto the ribbon and hang from pegs.
- This project can be finished with wax or varnish, which are also carried in the DecoArtPaints line. If you finish it, do not paint the carbon paint strip since you will be changing the dates with a chalk pen.
- Change the dates using a chalk pen by writing with it by hand in cursive or straight lettering.
Hang the sign and finish decorating for the holidays!
- Attach command strips to the back and hang the sign!
The garland looks so pretty in person. The Christmas craft is easily customized to your own design ideas!

Don't you love the blingy balls!? I found all the little touches while walking around Michaels Craft Store. The gold writing is with Chalk Ink Wet Wipe Markers. I love them. They are my favorite chalk markers! Ever! The color I used was Solid Gold Dancer! Can you hear me singing? Stayin Alive! Stayin Alive!
That’s it! Your beautiful, custom DIY Christmas Countdown Sign is finished. The smooth, rustic look of the Chalky Finish paint makes this sign a perfect addition to any mantle or holiday display, and the countdown feature makes it a fun family tradition year after year. If you loved this easy tutorial, be sure to check out our complete Christmas Crafts category for more festive DIY ideas! We’d love to see your finished sign—did you customize the colors or lettering? Share a photo and let us know on social media by tagging us @DearCreatives!
- New here? Be sure to Subscribe.
- Pin it for Later
- Follow us on Pinterest
- Shop our favorites on Amazon


This post was previously sponsored by DecoArt. All images, text, and opinions are 100% my own. We hope you enjoy creating your own Chalky finish Project!
- Look no further, just visit here for “more chalk paint ideas and inspiration”
Have you created any projects or holiday projects with Chalk Paint? Do you think you will do this craft: DIY Christmas Countdown sign?


It’s been a while since I’ve been crafty. I’m creative in other ways I guess. My son would love a countdown in our house. He LOVES Christmas!
Hi Stacie, You are creative! Especially with your cooking & photography! I bet her would. I haven’t met a kid that didn’t like Christmas! But, I know what you mean some love it more than others!!
This is so cute! I want something similar to this to hang our stockings on, since we dont have a mantle or anything for those. 🙂
Thanks Lauren, I know we don’t have a mantel that we can hang our stockings on either. I’ll have to hang ours from it on Christmas Eve.
Love this craft idea! I think I need to make one now:)
Hey Joanna, Yes, do it! Good luck & hope you entered!
I have a project similar to this I’ve been wanting to complete in my bathroom so I would use it for that!
Hi Julie, Yes! I have the same I was thinking of doing our bathroom cabinets in our bathroom with chalk paint. Our remodel is coming along but, taking forever it feels like! Good luck!!
This is precious! I used plastic push pins to hang my stockings #fail
Hi Josi, Thank you! I’ll have to add our stockings to ours on Christmas eve. We don’t have the right kind of mantel for hanging either!
I don’t know what I would do for sure, because there are so many projects that come to mind. I’m loving your sign you made, though. Really cute.
Thanks for the chance to win. =0)
Hey Kim, If you win just head over to DecoArt inspiration section in this post and you’ll find tons of other projects you can do! & don’t forget you can paint furniture, up-cycle (like my DIY kitchen/cart on side bar) projects too! Good luck!!
What a cute craft! If I were to win the paint, I would use it to make a cute sign for my daughter’s room.
I would paint some wood diy Christmas ornaments.
Gorgeous, I love how it turned out!I’d love to paint the wood letters, too!
I’d love to paint the wood letters, too!
I really like how this turned out! The countdown element is so clever!!
I would love to paint some wooden pic frames and chunky candle holders!